Diwali Arduino Project: a Flameless OLED Diya with Fireworks and Happy Diwali
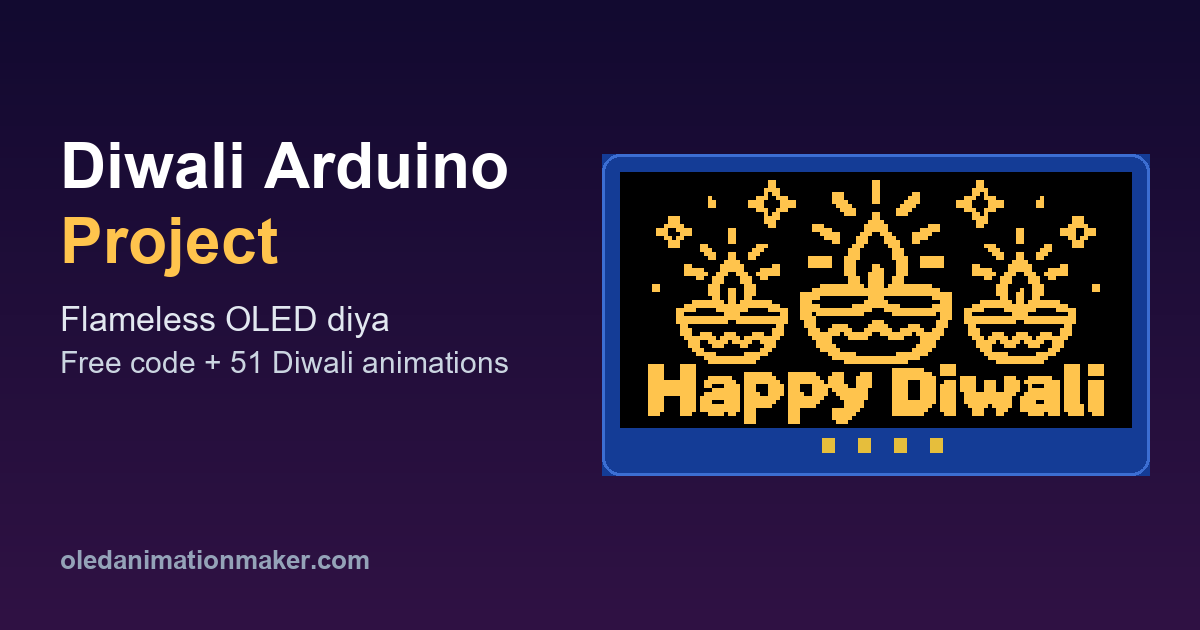
This Diwali Arduino project turns a tiny, low-cost OLED screen into a flameless diya. A small oil lamp glows on the left, its flame flickers like a real one, sparkles drift around it, and "HAPPY DIWALI" sits beside it. You need an Arduino, a 0.96 inch OLED and four wires. There is no soldering, no flame and nothing gets hot, so it works on a classroom desk, in a dorm room or on an apartment windowsill where candles are not allowed.
Diwali, the Festival of Lights, falls on Sunday, November 8, 2026. New York City now closes its public schools for Diwali, and many US libraries run Diwali STEM activities, so a light-up diya that also teaches coding is a good fit. Below you get the wiring, a complete copy-paste sketch, 51 ready Diwali animations you can load in one click, a way to add your own name, and a 45-minute lesson plan for grades 6 to 12.
Quick answer. Wire a 128x64 SSD1306 OLED to an Arduino Uno (GND to GND, VCC to 5V, SDA to A4, SCL to A5). Install Adafruit SSD1306 and Adafruit GFX from the Library Manager. Upload the flameless diya sketch below. For more scenes, open the free OLED Animation Maker, click the 🪔 Diwali tab, pick a picture and click Get the Code.
What you need for this Diwali STEM project
Everything here comes in most Arduino starter kits. If you are buying parts in the US, the generic 0.96 inch modules on Amazon cost a few dollars each, and Adafruit and SparkFun sell well-documented versions with clear pin labels. In India, the same modules are sold on Amazon.in and Robu.in.
| Part | Notes |
|---|---|
| Arduino Uno, Nano or ESP32 | Any of them works. An ESP32 has room for long animations. |
| 0.96 inch 128x64 OLED, SSD1306, I2C | The 4-pin version (GND, VCC, SCL, SDA). Blue, white or two-color all work. |
| 4 female-to-male jumper wires | Or a breadboard and male-to-male wires. |
| USB cable | Use a data cable, not a charge-only one. |
| Optional: 5V USB power bank | Lets the diya run anywhere after you upload the code. |
If your OLED is the larger 1.3 inch module, it probably uses the SH1106 chip instead. The SH1106 vs SSD1306 guide shows how to tell them apart and what to change.
Wire the OLED to your Arduino
The OLED talks over I2C, so it only needs two data wires plus power.
| OLED pin | Arduino Uno / Nano | ESP32 DevKit | ESP8266 NodeMCU |
|---|---|---|---|
| GND | GND | GND | G |
| VCC | 5V | 3V3 | 3V |
| SCL | A5 | GPIO 22 | D1 (GPIO 5) |
| SDA | A4 | GPIO 21 | D2 (GPIO 4) |
- Unplug the Arduino from USB before you connect anything.
- Read the pin labels printed on your OLED. Some modules start with VCC and some with GND.
- Connect GND first, then VCC, then SCL and SDA as shown in the table.
- Double-check VCC and GND, then plug the USB cable back in.
Swapping VCC and GND is the one mistake that can damage the screen, so it is worth the extra look. A full beginner walkthrough with photos is in the Arduino OLED display tutorial.
The flameless Diwali diya sketch (copy and paste)
First install the libraries. In the Arduino IDE open Tools → Manage Libraries, search for Adafruit SSD1306 and install it. Accept the prompt to install Adafruit GFX Library too. Then paste this sketch, pick your board and port, and click Upload.
// Flameless Diwali diya for a 128x64 SSD1306 OLED
// oledanimationmaker.com
#include <Wire.h>
#include <Adafruit_GFX.h>
#include <Adafruit_SSD1306.h>

Adafruit_SSD1306 display(128, 64, &Wire, -1);

const int SPARKS = 12;          // number of twinkling sparkles
int sparkX[SPARKS], sparkY[SPARKS], sparkLife[SPARKS];

// Clay lamp: a half circle bowl with a pointed spout on the right
void drawDiya(int cx, int baseY) {
  display.fillCircle(cx, baseY - 14, 14, SSD1306_WHITE);
  display.fillRect(cx - 15, baseY - 29, 31, 15, SSD1306_BLACK); // cut the top half away
  display.drawFastHLine(cx - 17, baseY - 14, 35, SSD1306_WHITE); // rim
  display.fillTriangle(cx + 13, baseY - 14, cx + 22, baseY - 18, cx + 11, baseY - 10, SSD1306_WHITE);
}

// Flame: a teardrop that changes height and leans a little every frame
void drawFlame(int cx, int baseY) {
  int height = 10 + random(0, 6);   // 10 to 15 pixels tall
  int lean = random(-1, 2);         // -1, 0 or +1
  int y = baseY - 19;
  display.fillCircle(cx + lean, y, 4, SSD1306_WHITE);
  display.fillTriangle(cx - 4 + lean, y, cx + 4 + lean, y, cx + lean * 2, y - height, SSD1306_WHITE);
  display.fillCircle(cx + lean, y + 1, 1, SSD1306_BLACK);  // dark core of the flame
  display.drawFastVLine(cx, baseY - 15, 2, SSD1306_WHITE); // wick
}

void drawSparks() {
  for (int i = 0; i < SPARKS; i++) {
    if (sparkLife[i] <= 0) {         // respawn a finished sparkle
      sparkX[i] = random(2, 60);
      sparkY[i] = random(2, 30);
      sparkLife[i] = random(3, 9);
    }
    display.drawPixel(sparkX[i], sparkY[i], SSD1306_WHITE);
    if (sparkLife[i] > 3) {          // bright sparkles get a small plus shape
      display.drawPixel(sparkX[i] - 1, sparkY[i], SSD1306_WHITE);
      display.drawPixel(sparkX[i] + 1, sparkY[i], SSD1306_WHITE);
      display.drawPixel(sparkX[i], sparkY[i] - 1, SSD1306_WHITE);
      display.drawPixel(sparkX[i], sparkY[i] + 1, SSD1306_WHITE);
    }
    sparkLife[i]--;
  }
}

void setup() {
  // Change 0x3C to 0x3D if your screen stays dark
  if (!display.begin(SSD1306_SWITCHCAPVCC, 0x3C)) {
    while (true) {}
  }
  randomSeed(analogRead(A0));
  for (int i = 0; i < SPARKS; i++) sparkLife[i] = random(0, 9);
}

void loop() {
  display.clearDisplay();
  display.setTextColor(SSD1306_WHITE);
  display.setTextSize(2);           // 12 x 16 pixels per letter
  display.setCursor(62, 14);
  display.print("HAPPY");
  display.setCursor(56, 36);
  display.print("DIWALI");
  drawDiya(30, 60);
  drawFlame(30, 60);
  drawSparks();
  display.display();
  delay(70);                        // about 14 frames per second
}
When it works you see a lamp in the lower left, a flame that never holds still, sparkles
popping in and out above it, and "HAPPY DIWALI" in two lines on the right. The flame uses
random() for its height and lean, which is what makes it look alive. Change the
delay(70) to 40 for a faster flicker or 120 for a calm one.
The sketch draws everything with shapes instead of stored images, so it uses only a few
kilobytes and fits easily on an Arduino Uno. If you want to understand how frames and
display.display() work, the SSD1306
animation tutorial explains the drawing loop step by step.
51 ready Diwali OLED animations you can load in one click
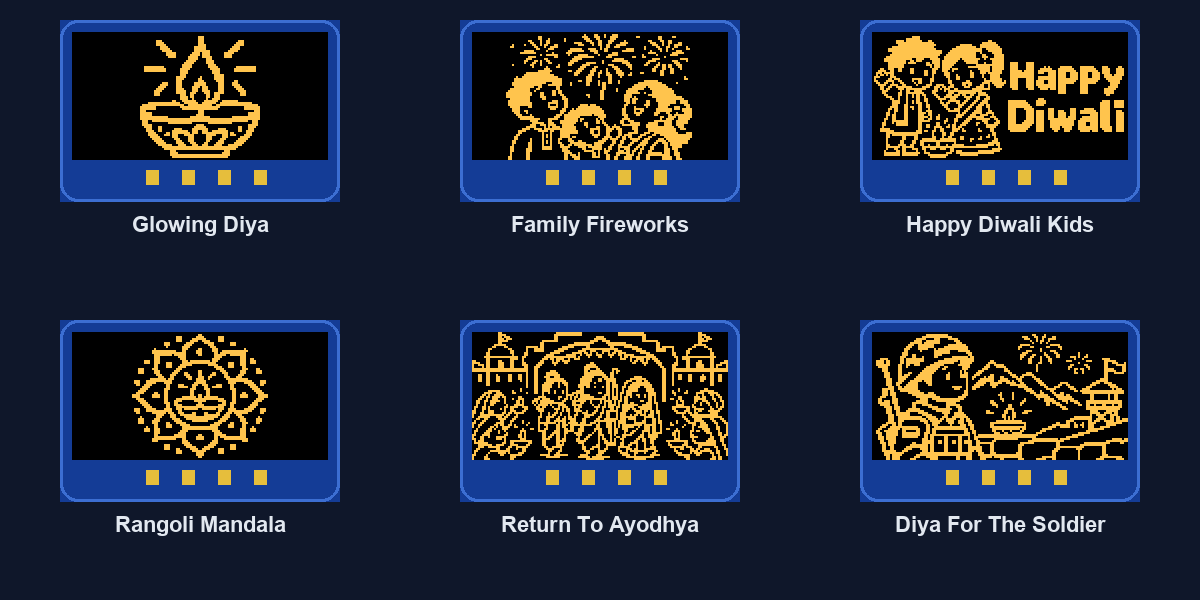
Drawing a whole scene with shapes takes a lot of code, so I made a free Diwali pack. Open the OLED Animation Maker, click the 🪔 Diwali tab right after "All", and you get 51 pixel-art scenes sized for a 128x64 screen. Click any card, then Get the Code, and the tool writes a complete Arduino sketch for your board and library.
- Lights and decorations: a glowing diya, star lanterns, a rangoli mandala, a house lit for Diwali.
- Fireworks: sparklers, a fountain firework, a rocket launch and a family watching the sky. These are drawings for the screen; real fireworks need adult supervision and must follow your local rules.
- Greetings: Happy Diwali with three diyas, and two kids waving beside the words.
- The meaning of the festival: the return to Ayodhya, one diya lighting another, a diya for a soldier on duty, and sharing sweets.
- Kind to animals: a girl feeding a street puppy, a boy calming his dog during the fireworks, and a quiet Diwali for the birds.
The editor shows the picture zoomed in, so it looks blocky on a laptop screen. On a real 0.96 inch OLED the pixels are tiny and the scene looks sharp. Each picture is 1,024 bytes of flash, so several of them fit on an Uno. If you want to check the result before you flash it, the OLED Simulator plays it in your browser.
Add "Happy Diwali" and your name with Assemble Studio
A diya that says "Happy Diwali, Priya" makes a lovely gift for a friend or a teacher. The free Assemble Studio has a Diwali section for exactly this:
- Open Assemble Studio and find the 🪔 Diwali special row under the text box.
- Tap Happy Diwali + Name. It fills the text with your name and picks the Sparkle Pop style.
- Or click a Diwali picture, tick Then show my text after the picture, and type "Happy Diwali" plus a name.
- Pick a style such as Firework or Fountain Up. The picture flies together pixel by pixel, then the greeting follows.
- Click Get the Code and upload the sketch the same way as before.
These assemble animations have many frames. A long one can be too big for the 32 KB flash of an Uno, so use an ESP32 for them, or shorten the animation. The Uno memory limits guide shows how to work out what fits.
Use it as a 45-minute Diwali STEM lesson (grades 6 to 12)
Many Diwali classroom activities are paper circuits for young children. This project gives older students real code to read and change, and it still ends with a glowing diya they can take home. Here is a plan that fits one class period with groups of two or three.
| Time | Activity | What students learn |
|---|---|---|
| 5 min | Why diyas are lit for Diwali: light winning over darkness | Cultural context for the build |
| 10 min | Wire the OLED using the pin table | Power, ground and I2C data lines |
| 10 min | Upload the diya sketch and watch it run | Libraries, upload, the setup and loop functions |
| 15 min | Change it: flame speed, number of sparkles, their own message | Variables, random(), coordinates on a 128x64 grid |
| 5 min | Share the screens and clean up | Explaining what each change did |
Good extension tasks: make the flame lean in one direction like it is in a breeze, add a second diya, or move the text to the left. Students without hardware can run the whole sketch in the free Wokwi simulator; my Wokwi SSD1306 guide shows the setup.
ESP32 and ESP8266 Diwali projects
The flameless diya sketch runs unchanged on an ESP32 or an ESP8266. Wire the OLED with the pin table above (VCC to 3.3V, SDA to GPIO 21 and SCL to GPIO 22 on an ESP32, SDA to D2 and SCL to D1 on a NodeMCU), select your board in Tools → Board and upload. These boards have far more memory than an Uno, so an ESP32 Diwali project or an ESP8266 Diwali project can show more scenes and do more.
ESP32 Diwali project: a festival slideshow
An ESP32 has 4 MB of flash, enough for many full-screen scenes. Export several Diwali OLED
animations from the tool, such as the diya, the family fireworks and Happy Diwali Kids, and
play them one after another in loop(). Long assemble animations from Assemble
Studio, which are too big for an Uno, also fit comfortably. The
ESP32 OLED animation guide shows how to store
and play long frame sequences.
ESP8266 Diwali project: change the greeting over WiFi
A NodeMCU or Wemos D1 Mini has built-in WiFi, so you can send a new Diwali animation to the screen from your phone or laptop without plugging in a cable. Set it up once with the wireless WiFi OLED preview guide, then pick any scene in the Diwali tab and watch it appear on the desk lamp. It is a fun way to change "Happy Diwali" to "Happy New Year" the next morning.
| Board | Best Diwali OLED project | Why |
|---|---|---|
| Arduino Uno / Nano | Flameless diya sketch or one Diwali picture | 32 KB flash: shapes and single scenes fit |
| ESP32 | Slideshow of several Diwali OLED animations | 4 MB flash: long animations fit |
| ESP8266 (NodeMCU) | Change the greeting over WiFi | Built-in WiFi for live updates |
Troubleshooting your Diwali OLED
- Screen stays black. Why: wrong address, or SDA and SCL swapped. Fix: change
0x3Cto0x3Dand check the wires. The blank OLED checklist covers the rest. - Picture shifted by two pixels with a noisy column. Why: the module is an SH1106. Fix: choose SH1106 in the tool, or use a U8g2 sketch.
- "Sketch too big" on an Uno. Why: too many frames in an exported animation. Fix: use an ESP32, or pick a single Diwali picture.
- Upload fails or the port is missing. Why: a charge-only USB cable or the wrong board selected. Fix: try another cable and check Tools → Board.
- The flame looks frozen. Why: a very long
delay(). Fix: keep it between 40 and 120 milliseconds.
More Diwali build ideas
Put the board and a power bank in a small box with a cut-out window for the screen and you have a desk diya that runs all week. Add a push button to cycle between the diya, fireworks and a greeting, using the patterns in the OLED menu with buttons guide. If you liked the festival theme, the Navratri OLED animation uses the same hardware.
Frequently asked questions
When is Diwali 2026?
The main day of Diwali, Lakshmi Puja, is Sunday, November 8, 2026. The five-day festival starts with Dhanteras on Friday, November 6, and Govardhan Puja follows on Monday, November 9.
Is this Diwali Arduino project safe for a classroom?
Yes. There is no flame and nothing gets hot. The board runs from a USB cable or a 5V power bank, so it works in classrooms, dorms and apartments where candles and real diyas are not allowed.
What do I need to build a flameless electronic diya?
An Arduino Uno, Nano or ESP32, a 0.96 inch 128x64 SSD1306 I2C OLED, four jumper wires and a USB cable. Most starter kits already include all of them. No soldering is needed if your OLED has header pins.
Can I show Happy Diwali with my own name?
Yes. In Assemble Studio, tap Happy Diwali + Name, or pick a Diwali picture and tick Then show my text. The picture assembles first, then your greeting, and Get the Code gives you one sketch for the whole animation.
Can I build this Diwali project on an ESP32 or ESP8266?
Yes. The same sketch runs on both. Wire SDA and SCL to GPIO 21 and 22 on an ESP32, or D2 and D1 on an ESP8266 NodeMCU, and power the OLED from 3.3V. An ESP32 has room for a slideshow of long Diwali OLED animations, and an ESP8266 can receive new greetings over WiFi.
Will the Diwali animations fit on an Arduino Uno?
The flameless diya sketch draws with shapes, so it uses only a few kilobytes. A single Diwali picture is 1,024 bytes of flash. Long assemble animations can have hundreds of frames, so use an ESP32 for those, or cut the frame count for an Uno.
Why is my OLED blank after uploading?
Check that SDA and SCL are not swapped, that VCC and GND match the labels on your module, and that the address in the sketch matches your screen. Most modules use 0x3C; some use 0x3D. An I2C scanner sketch tells you which one you have.
Sources I checked for this guide: the Adafruit SSD1306 library, the Adafruit GFX graphics guide and Diwali on Wikipedia for the festival dates.
Related guides
- Arduino OLED display tutorial for beginners
- How to create SSD1306 OLED animations
- ESP32 OLED animation guide
- Simulate an SSD1306 OLED in Wokwi
- Navratri garba OLED animation
- Dussehra OLED animation
Free tools: OLED Animation Maker for SSD1306 and SH1106 animations, Assemble Studio for name and logo animations, the Shadow Box Lamp Generator for 3D-printed shadow lamps, Text to STL for 3D-printed names and keychains, and 3MF to Web to show 3D prints on any website. New: the Image to Byte Array converter, the OLED Robot Eyes generator and the Lithophane Maker. See all tools.