ESP32 OLED Animation: Complete Guide
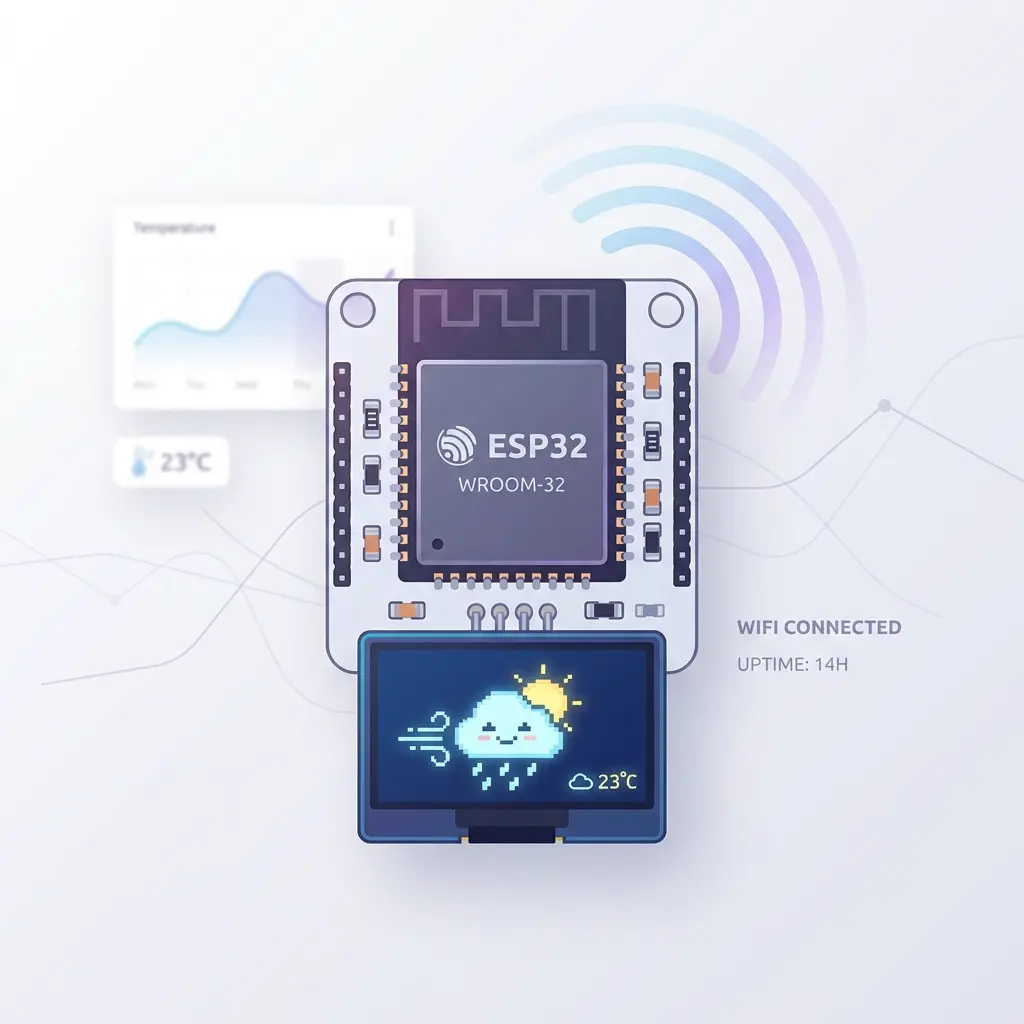
When I first switched from Arduino Uno to ESP32 for my OLED projects, it felt like upgrading from a bicycle to a motorcycle. Suddenly I had way more speed, memory, and—here's the game-changer—built-in WiFi. No more shields, no extra modules, just wireless capability right out of the box. For OLED animations, this opens up possibilities that would be impossible on a basic Arduino.
The ESP32 has become my go-to board for anything involving animated displays. It costs about the same as an Arduino Uno (sometimes even cheaper if you get the generic versions from AliExpress), but packs 4MB of flash storage compared to Uno's 32KB. That means you can store way longer animations—think 50 to 100 frames instead of struggling to fit 10 frames.
In this guide, I'll show you exactly how to create smooth ESP32 OLED animations. We'll cover the wiring (it's actually simpler than Arduino Uno), generating code specifically optimized for ESP32, and my favorite part—previewing your animations in real-time using either WebSerial over USB or completely wireless over your home WiFi. That second option still blows my mind every time I use it.
Why ESP32 is perfect for OLED animations
Let me explain why I recommend ESP32 for display projects, especially if you're planning to do animations:
1. Way more memory for your animations
An Arduino Uno has 32KB of flash (program memory) and 2KB of RAM. That sounds okay until you realize a single 128×64 pixel frame takes 1KB. So you're limited to maybe 10-15 frames max before you run out of space. The ESP32? It has 4MB of flash (that's 4,096KB) and 520KB of RAM. You could theoretically store thousands of frames—though you'd probably want to keep it reasonable for practical reasons.
Real-world example: I built a weather station that cycles through different animated weather icons—sun, clouds, rain, snow, thunder. Each animation has 12-15 frames. On an Arduino Uno, I could barely fit two of these animations. On ESP32, I fit all five plus some extra status icons, and I'm only using about 20% of the available memory.
2. Faster processor = smoother animations
Arduino Uno runs at 16 MHz. The ESP32 dual-core processor runs at 240 MHz—that's 15 times faster. For animations, this means you can update the display more frequently, add more complex graphics processing (like real-time image filtering), or even run multiple tasks simultaneously while your animation plays smoothly.
3. Built-in WiFi changes everything
This is where it gets really fun. With WiFi on board, you can:
- Preview animations wirelessly – Edit frames on your computer, see them instantly on the physical OLED without any USB cable connected
- Pull live data – Display weather updates, stock prices, social media notifications, or IoT sensor readings
- Remote control – Change what's displayed from your phone or another device on your network
- Update animations OTA – Upload new animations over WiFi without touching the board (Over-The-Air updates)
I built a desk clock with an ESP32 and OLED that pulls the current time from the internet, shows weather icons based on live forecast data, and even displays my calendar appointments. Try doing that with an Arduino Uno—you'd need a WiFi shield that costs more than the ESP32 itself!
ESP32 + SSD1306 OLED wiring (simpler than you think)
Good news: wiring an OLED to ESP32 is actually easier than wiring it to an Arduino Uno. Why? The I2C pins are clearly labeled, and most ESP32 boards have them in a convenient spot. Let me walk you through it step by step.
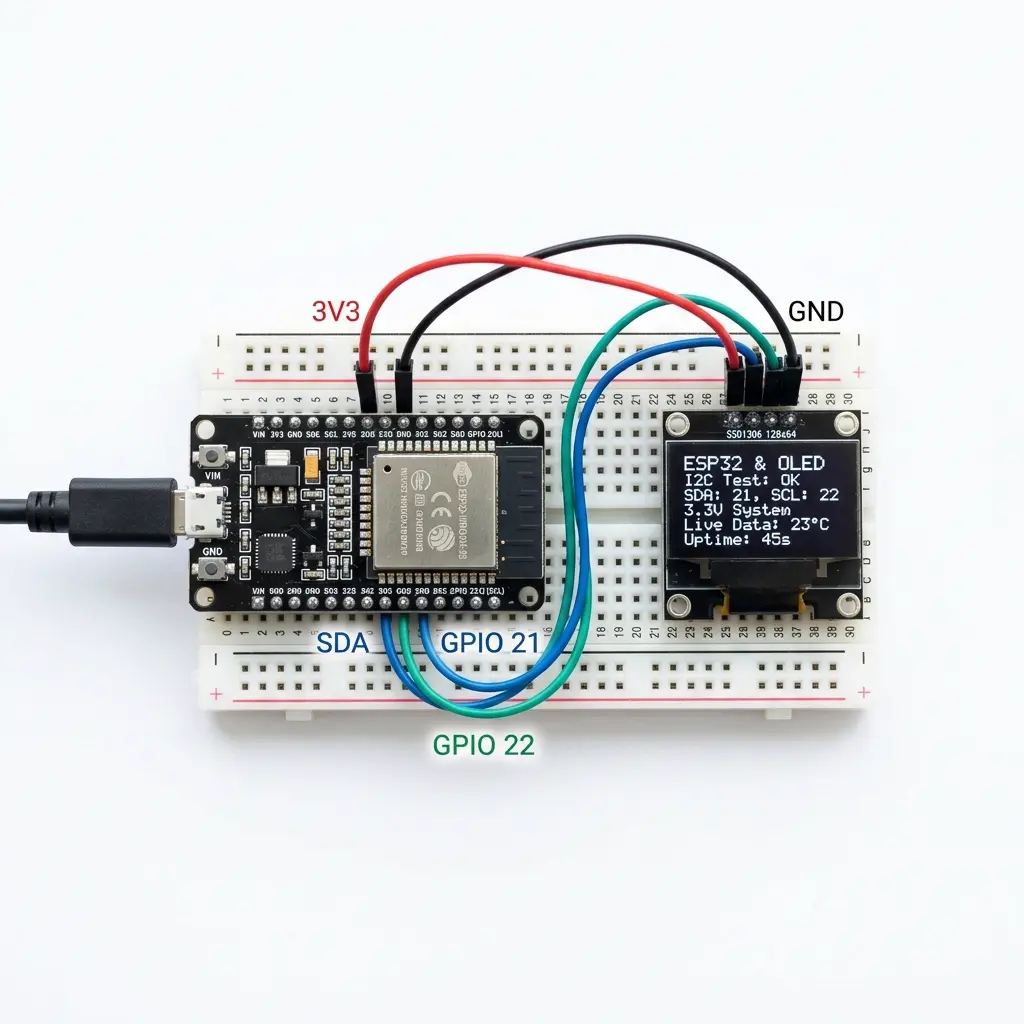
The four-wire I2C connection
Just like with Arduino, you only need four wires. Here's the exact pinout for a standard ESP32 DevKit (the most common board):
| OLED Display Pin | ESP32 Pin | Notes |
|---|---|---|
| VCC (Power) | 3.3V | Use 3.3V, not 5V (some displays tolerate 5V, but 3.3V is safer) |
| GND (Ground) | GND | Any GND pin works |
| SDA (Data) | GPIO 21 | Default I2C data pin |
| SCL (Clock) | GPIO 22 | Default I2C clock pin |
Important note about voltage: ESP32 is a 3.3V board, unlike the Arduino Uno which is 5V. Most SSD1306 OLED modules work fine with either voltage because they have built-in voltage regulators, but to be safe, connect VCC to the 3.3V pin on your ESP32, not the 5V pin. I've used dozens of these displays at 3.3V with zero issues.
What if my OLED doesn't work?
If you've wired everything correctly but the display stays blank, 99% of the time it's one of two issues:
-
Wrong I2C address: Most OLEDs use address
0x3C, but some use0x3D. Run an I2C scanner sketch (search "ESP32 I2C scanner" on Google) to find the actual address of your display. Then update your code to use that address. - SDA and SCL swapped: Yeah, I've done this more times than I'd like to admit. Double-check that SDA goes to GPIO 21 and SCL goes to GPIO 22. If they're backwards, the display will be completely silent.
Pro tip: Some ESP32 boards have the GPIO numbers printed right on the board, but they're tiny and hard to read. I keep a photo of my ESP32 pinout on my phone so I can zoom in when I need to double-check a connection. Saves me from hunting down the datasheet every time.
How to create ESP32 OLED animation code (the easy way)
Here's where things get really convenient. Instead of manually writing bitmap arrays and animation loops, you can use a free online tool that generates ESP32-ready code in about 2 minutes. I use this for pretty much every animation project now because it saves hours of tedious work.
Step-by-step animation code generation
- Open the OLED animation maker: Go to oledanimationmaker.com. No sign-up, no download, just opens in your browser.
- Select your board: Click the board dropdown at the top and choose ESP32 DevKit. This tells the tool to use the correct pin numbers (GPIO 21/22) in the generated code.
- Choose your display: Pick SSD1306 128×64 (the most common size) or SH1106 if that's what you have. If you're not sure, it's probably SSD1306. The 0.96-inch displays are almost always 128×64.
-
Create your animation: You've got three options here:
- Use a template – There are 100+ pre-made animations (weather icons, loaders, faces, UI elements). Just click one and you're done.
- Import a GIF – Drop your own animated GIF file and it'll convert it to OLED format automatically
- Draw from scratch – Use the pixel editor to create custom animations frame by frame
- Preview and adjust: Click through your frames, adjust the FPS (frames per second) until it looks smooth. The preview shows exactly how it'll look on the real display.
-
Get the code: Click "Get the Code" button. You'll see a complete Arduino sketch ready to copy. It includes:
- All necessary library includes
- Your animation frames as PROGMEM arrays (stored in flash, not RAM)
- Setup code with the correct I2C pins for ESP32
- A smooth animation playback loop
- Upload to ESP32: Copy the code, paste it into Arduino IDE, select your ESP32 board from Tools → Board menu, select the COM port, and click Upload. Done!
Choosing between Adafruit SSD1306 and U8g2 libraries
The tool lets you export code for two different libraries. Here's my honest take on which to use:
Adafruit SSD1306 – This is what I recommend for beginners. It's well-documented, tons of examples online, and if you google "ESP32 OLED" most tutorials use this library. The syntax is straightforward, and the community support is excellent. When you hit a problem, chances are someone else already solved it on the Arduino forum.
U8g2 – This is what I use for my more advanced projects. It uses less memory (important if you have huge animations), renders faster, and has 100+ built-in fonts including really nice bitmap fonts. The downside? The learning curve is steeper, and you'll spend more time reading documentation. Switch to this once you're comfortable with OLED programming.
My advice: Start with Adafruit SSD1306. Get your first animation working. Play around. Once you're comfortable, try the same animation with U8g2 and see if you notice the performance difference. On ESP32, honestly, both work great.
WebSerial live preview: Test animations without re-uploading code
Okay, this is hands-down my favorite feature when working with ESP32 and OLED displays. Let me explain why it's such a game-changer for animation design.
Normally, when you're designing an animation, the workflow is painful. You create some frames, generate the code, upload it to your ESP32 (which takes 30-60 seconds), then watch the animation play. "Hmm, that's too fast. And frame 7 looks weird." So you go back, adjust the FPS and fix frame 7, regenerate code, upload again, wait another minute... It's frustrating and kills your creative flow.
WebSerial changes everything. You upload a receiver sketch to your ESP32 once. After that, every frame you create or edit in your browser instantly appears on the physical OLED connected to your ESP32. No code generation, no re-uploading, no waiting. You're basically using your ESP32 and OLED as a live external monitor for the web editor. It honestly feels like magic the first time you see it work.
Setting up WebSerial with ESP32 (5-minute setup)
- Open the OLED animation maker: Make sure you're in Chrome or Edge browser. WebSerial doesn't work in Firefox or Safari yet—it's a Chrome-based API thing, not our limitation.
- Click the USB connect button: You'll see a "🔌 USB" button in the top right. Click it.
- Copy the receiver sketch: A panel pops up with Arduino code. Select it all and copy it.
- Upload to your ESP32: Paste the code into Arduino IDE, select your board (Tools → Board → ESP32 Dev Module), pick the COM port, and upload. This happens once. The sketch turns your ESP32 into a serial-controlled display.
- Connect via WebSerial: After the upload finishes and your ESP32 reboots, go back to the browser, click the USB button again, click "Connect," and choose your ESP32's COM port.
- Start creating: That's it! Anything you do in the editor—drawing pixels, changing frames, adjusting FPS—shows up on your physical OLED in real time. It's incredibly satisfying.
Pro tip: The WebSerial connection can drop if your USB cable is loose or you bump it. When that happens, just click Connect again. The receiver sketch is still running on your ESP32, so it reconnects instantly. I use WebSerial for basically all my animation design now—seeing changes immediately beats the upload-wait-repeat cycle every single time.
For a deeper dive, I wrote a complete guide: How to live connect OLED with WebSerial.
Wireless WiFi OLED preview: No USB cable required
If WebSerial impressed you, wireless WiFi preview will blow your mind. Picture this: your ESP32 is sitting across the room (or even in another room), not connected to your computer at all. You're editing animations on your laptop, and they appear wirelessly on the OLED attached to the ESP32. This is the kind of thing that makes the ESP32 worth choosing over a basic Arduino.
How wireless preview works
Instead of sending data through USB, your ESP32 connects to your home WiFi network. The OLED animation maker website (running in your browser) sends frame data to your ESP32 over WiFi. Your ESP32 receives it and displays it on the OLED. Both devices just need to be on the same network.
When wireless preview is genuinely useful
- Testing in final placement: If your project will be mounted on a wall or inside an enclosure, you can see how the animation looks in its final location without a USB cable trailing across the room.
- Multiple devices: Working on several ESP32s at once? Preview animations on multiple displays.
- Portable testing: Move your ESP32 anywhere WiFi reaches and keep previewing.
- Demos: Show your project to someone without being tethered to your laptop.
Quick setup for wireless preview
- Click the "📡 WiFi" button in the OLED animation maker
- Copy the WiFi receiver sketch that appears
- Fill in your WiFi name and password in the sketch (
WIFI_SSIDandWIFI_PASS) - Upload the sketch to your ESP32 (the only time you need USB)
- Watch the OLED—after a few seconds it shows an IP address like
192.168.1.45 - Enter that IP in the web tool's WiFi connect panel and click Connect
- Start editing—your changes appear wirelessly!
Security note: Your WiFi password is stored on the ESP32, not sent anywhere online. The connection happens entirely on your local network. The web tool never sees your WiFi credentials. Full walkthrough with troubleshooting: Wireless WiFi OLED live preview guide.
Using ESP8266 instead (NodeMCU / Wemos D1 Mini)
Maybe you've got an ESP8266 board lying around instead of an ESP32. Good news—it works great for OLED animations too, and the process is nearly identical. The ESP8266 is the ESP32's older, simpler sibling. It has WiFi but only a single core and less RAM. For most OLED animation projects, though, it's totally fine.
The main difference is the wiring. ESP8266 boards use different pin labels:
| OLED Pin | ESP8266 Pin | GPIO Number |
|---|---|---|
| VCC | 3.3V | — |
| GND | GND | — |
| SDA | D2 | GPIO4 |
| SCL | D1 | GPIO5 |
In the OLED animation maker, just select the ESP8266 board preset and the generated code will use the correct D1/D2 pins automatically. The ESP8266 has slightly less RAM than ESP32, so if you're doing really long animations (50+ frames), you might hit memory limits sooner. For typical animations of 10-20 frames, you'll be perfectly fine.
ESP32 vs ESP8266 vs Arduino Uno: Which should you use?
People ask me this all the time, so let me give you my honest breakdown based on years of building OLED projects:
| Feature | Arduino Uno | ESP8266 | ESP32 |
|---|---|---|---|
| Flash storage | 32 KB | 4 MB | 4 MB |
| RAM | 2 KB | 80 KB | 520 KB |
| Speed | 16 MHz | 80 MHz | 240 MHz |
| WiFi | No | Yes | Yes |
| WebSerial | Limited | Yes | Yes |
| Best for | Learning, simple projects | WiFi projects, budget builds | Everything, complex animations |
My recommendation: If you're just learning electronics and following basic tutorials, the Arduino Uno is fine and has the biggest community. But if you're serious about OLED animations and want room to grow, get an ESP32. The extra memory, speed, and WiFi make it worth the (tiny) price difference. The ESP8266 is a good middle ground if you find one cheap and want WiFi without the full ESP32 power.
Project ideas to try with your ESP32 and OLED
Now that you know how to create animations, here are some project ideas I've built or seen in the community that you can tackle:
- WiFi weather clock – Pull live weather data and show animated icons (sun, rain, snow) with the current temperature
- Notification display – Show alerts from your phone, email count, or smart home events
- Crypto/stock ticker – Display live prices with up/down animations
- Robot face – Animated eyes and expressions for a desk robot or toy
- System monitor – Show your PC's CPU usage, temperature, or network stats
- Pomodoro timer – A focus timer with animated countdown
Each of these starts with the same basic skill: creating an animation and displaying it. Once you've got that down, adding WiFi data or sensor inputs is the next fun step.
Frequently asked questions
Does ESP32 work with Adafruit SSD1306 library?
Yes, perfectly. The Adafruit SSD1306 and GFX libraries support ESP32 out of the box. Just install the ESP32 board package in Arduino IDE first (via Boards Manager), then the libraries work exactly like they do on Arduino Uno.
Can I power the OLED from the ESP32's 3.3V pin?
Yes. A 0.96-inch SSD1306 OLED draws very little current (around 20mA), well within what the ESP32's 3.3V regulator can supply. No external power needed for a single display.
Why is my ESP32 OLED display blank?
Usually it's the wrong I2C address (try 0x3D instead of 0x3C), swapped SDA/SCL pins, or you forgot to call display.display() after drawing. Run an I2C scanner sketch to confirm your display's address first.
How many animation frames can ESP32 store?
With 4MB of flash, you can store hundreds of 128×64 frames (each frame is 1KB). In practice, keep it reasonable—50 to 100 frames is plenty for smooth animations and leaves room for your other code.
The animation stutters only after Wi-Fi connects
The radio and the OLED share one core’s time unless you split them carefully. A full 1024-byte
display() at the default I2C clock is on the order of 100 ms, and a transmit can land
in the middle of it. Draw from a single task, and raise Wire.setClock(400000) only after
the picture is stable on short wires to GPIO21 and GPIO22.
ESP32 reboots when the animation and Wi-Fi start together
That is often a brownout, not a bad bitmap. The OLED charge pump and a Wi-Fi spike share the DevKit
regulator. Power the board from a solid USB supply, put a local capacitor on the OLED VCC, and connect
Wi-Fi after the first successful frame at address 0x3C.
Can I animate on one core and run Wi-Fi on the other?
You can pin the network work to the other core, and you should still call Adafruit or U8g2 draw functions from one task only. Two tasks writing the same 1024-byte buffer tear the frame. A queue of “show frame N” messages is the safe handoff.
Popular searches: esp32 oled animation · esp32 ssd1306 · esp8266 oled · esp8266 oled wifi · wireless oled arduino · webserial oled preview · wifi oled esp32
ESP32 OLED animation maker — free
Templates, GIF import, WebSerial or WiFi preview, one-click export.
Open Tool →Keeping Wi-Fi from stealing the frame budget
Flash size is why an ESP32 holds a long animation. The stutter people see after WiFi.begin
is a scheduling problem, not a missing frame in PROGMEM. A 128×64 SSD1306 frame is 1024 bytes. At the
default I2C clock near 100 kHz, pushing that buffer takes on the order of 90–100 ms of bus time. A
Wi-Fi transmit on the same core can land inside that window, so the next frame starts late and the
motion bunches. Those transfer times are bus arithmetic for a typical module, not a lab capture of one
DevKit.
| What you are sending | Clock | Rough time on the wire | Practical pace |
|---|---|---|---|
| Full 128×64 frame (1024 bytes) | ~100 kHz default | ~90–100 ms | About 8–10 FPS if the radio is quiet |
| Same full frame | 400 kHz | ~25 ms | Room for 15–20 FPS plus Wi-Fi idle time |
| 32×32 sprite (128 bytes) | ~100 kHz | a small fraction of a full frame | The radio, not the icon, sets the jitter |
Call Wire.setClock(400000) only after a still image at address 0x3C is clean
on GPIO21 (SDA) and GPIO22 (SCL). Long jumpers sparkle at 400 kHz; shorten them before you blame the
bitmap. Draw from one task. If a second task must decide which frame to show, hand it an integer over
a queue. Two tasks calling drawBitmap on the same Adafruit buffer tear the picture, and
the tear looks like a damaged export.
A second build: clock plus a short local animation
A desk clock that also plays a 12-frame weather icon is the case where this budget matters. Structure
loop() as three gates, all on millis(). Every 60 seconds, if the network is
already up, read the value you care about and store it in a plain int. Every 100 ms,
advance the icon frame and draw it into the top-left 32×32, then draw the hour and minute as text,
then call display() once. Never call display() from the Wi-Fi event path.
Connect Wi-Fi in setup() after the first successful frame, not in the same breath as
display.begin, so the charge-pump startup and the association spike do not share one
moment on a weak USB cable. A local 10–100 µF across OLED VCC, at the module, covers the panel side
of that spike.
ESP8266 (SDA on D2, SCL on D1) can run the same gate pattern and has less RAM for a second buffer, so
keep a single 1024-byte driver buffer and the frames in flash. On either chip, skip
delay(100) as the frame timer. delay blocks the Wi-Fi stack’s chance to run
between draws on the cooperative parts of the core, and the association drops while the icon looks
smooth. The 100 ms test against millis() returns immediately when it is not time to draw,
which is the gap the radio needs. If the clock still reboots as the icon starts, read the serial
banner for a brownout message before you regenerate the frames — the supply is the usual cause once
the address scan has already found 0x3C.