ESP32 Christmas countdown on an OLED: wiring, NTP code and fixes
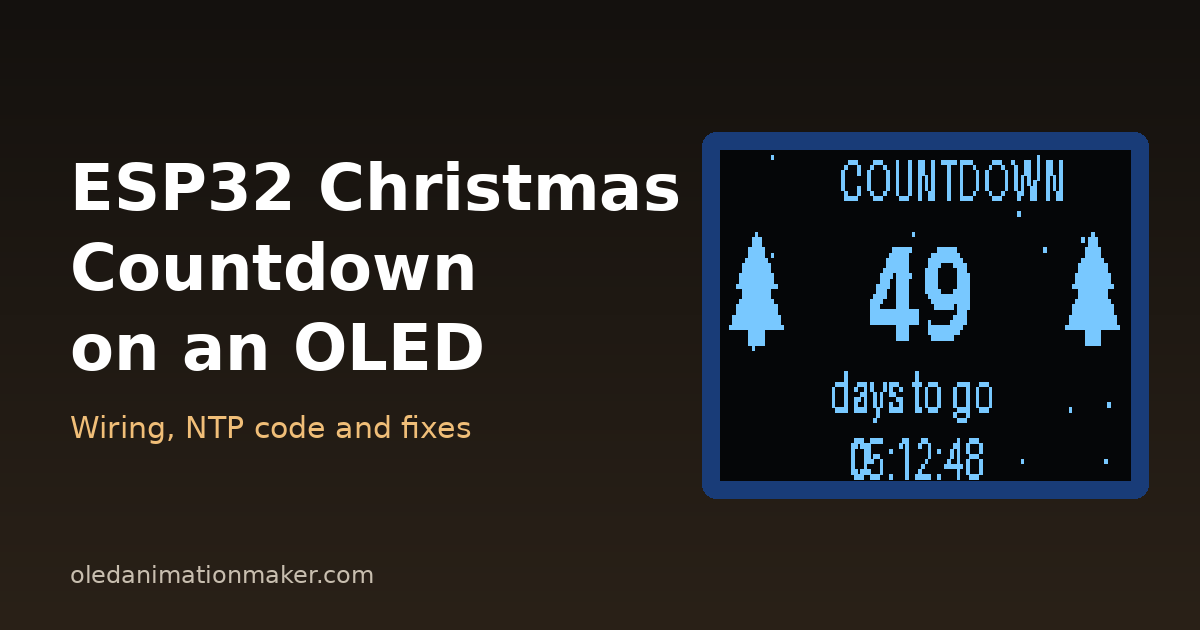
This guide shows you how to build an ESP32 Christmas countdown on a small OLED screen. It shows the days, hours, minutes and seconds left until December 25, with two pixel trees and gentle falling snow. You need an ESP32 board, a 0.96 inch OLED and four wires. There is no clock module and no soldering. The ESP32 gets the exact time from the internet over WiFi, so the count is always right.
Short version. Wire the SSD1306 OLED to 3V3, GND, GPIO 21 (SDA) and GPIO 22 (SCL). Install the Adafruit SSD1306 and Adafruit GFX libraries. Paste the sketch below, add your 2.4 GHz WiFi name and password, and pick your time zone string. The ESP32 reads the time with NTP, works out the seconds left until midnight on December 25, and redraws the screen ten times a second.
What the ESP32 Christmas countdown does
When you plug it in, the screen says "Connecting WiFi", then "Getting time". A few seconds later the countdown appears.
The top line reads CHRISTMAS COUNTDOWN. The middle shows the number of days in large digits, with a small tree on each side. The bottom line shows the hours, minutes and seconds as a running clock. Snowflakes drift down behind the text.
On Christmas Day the countdown is replaced by a "Merry Christmas!" message for the whole day. At midnight on December 26 it starts counting to next Christmas by itself. You never need to reflash it. For example, on November 6, 2026 at midnight it shows 49 days to go.
What you need
- An ESP32 board. A classic ESP32 DevKit V1 (ESP32-WROOM-32) is about $6 to $10 on Amazon US. An ESP32-C3 SuperMini or an ESP32-S3 DevKit also works.
- A 0.96 inch 128x64 I2C OLED with the SSD1306 chip. It has four pins: GND, VCC, SCL and SDA. Expect about $5 to $8 for one.
- Four female-to-female jumper wires, or a breadboard and male-to-male wires.
- A USB data cable and a phone charger to run it once it is finished.
- A 2.4 GHz WiFi network. Most ESP32 boards cannot see 5 GHz networks.
ESP32 OLED wiring
The OLED talks to the ESP32 over I2C. I2C is a two-wire bus: SDA carries the data and SCL carries the clock signal. Power the screen from the 3.3 V pin. Most of these modules also accept 5 V, but 3.3 V is the safe choice for the ESP32 pins.
| OLED pin | ESP32 DevKit V1 | ESP32-C3 SuperMini | ESP32-S3 DevKitC-1 |
|---|---|---|---|
| GND | GND | GND | GND |
| VCC | 3V3 | 3V3 | 3V3 |
| SCL | GPIO 22 | GPIO 9 | GPIO 9 |
| SDA | GPIO 21 | GPIO 8 | GPIO 8 |
| In the sketch | SDA_PIN 21, SCL_PIN 22 | SDA_PIN 8, SCL_PIN 9 | SDA_PIN 8, SCL_PIN 9 |
Check the labels printed on your OLED. Some modules swap the order to VCC, GND, SCL, SDA, and swapping VCC and GND can damage the screen. If you are new to this display, the ESP32 OLED animation guide has photos of the same GPIO 21 and 22 wiring. The tiny ESP32-C3 boards with a built-in 0.42 inch screen are different, and are covered in the ESP32-C3 0.42 OLED guide.
Install the board package and libraries
- In the Arduino IDE, open Tools > Board > Boards Manager, search for esp32 and install esp32 by Espressif Systems.
- Pick your board under Tools > Board > esp32. For a DevKit V1, choose ESP32 Dev Module. For a C3 SuperMini, choose ESP32C3 Dev Module and set USB CDC On Boot to Enabled so the Serial Monitor works.
- Open Sketch > Include Library > Manage Libraries, search for Adafruit SSD1306 and install it. Say yes when it asks to install Adafruit GFX and Adafruit BusIO too.
You do not need a separate time or NTP library. The ESP32 core already includes configTzTime() and
getLocalTime(). You can read both functions in the
arduino-esp32 time source file.
The display functions come from the
Adafruit SSD1306 library.
Pick your time zone string
NTP servers send the time in UTC, the world reference time. The ESP32 needs a time zone string to turn that into
your local time. The string also holds the daylight saving rules, so the count stays right when the clocks change.
Copy the line for where you live into TZ_INFO in the sketch.
| Where you live | TZ_INFO string |
|---|---|
| US Eastern (New York, Toronto) | EST5EDT,M3.2.0,M11.1.0 |
| US Central (Chicago) | CST6CDT,M3.2.0,M11.1.0 |
| US Mountain (Denver) | MST7MDT,M3.2.0,M11.1.0 |
| Arizona (no daylight saving) | MST7 |
| US Pacific (Los Angeles) | PST8PDT,M3.2.0,M11.1.0 |
| UK (London) | GMT0BST,M3.5.0/1,M10.5.0 |
| Central Europe (Berlin, Paris) | CET-1CEST,M3.5.0,M10.5.0/3 |
| Australia East (Sydney) | AEST-10AEDT,M10.1.0,M4.1.0/3 |
The sign looks backwards, but it is correct. "EST5" means five hours behind UTC, and "CET-1" means one hour ahead. The parts after the commas give the start and end of daylight saving. For other places, the open POSIX time zone list has a string for every city.
The ESP32 Christmas countdown sketch
Paste this into a new sketch. Change the lines marked CHANGE: your WiFi details, the time zone, and the SDA and SCL pins if you are not using a DevKit V1.
// ESP32 Christmas countdown on a 128x64 SSD1306 OLED
// Gets the time from the internet (NTP) and counts down to Dec 25.
#include <WiFi.h>
#include <time.h>
#include <Wire.h>
#include <Adafruit_GFX.h>
#include <Adafruit_SSD1306.h>

// ---------- settings ----------
const char* WIFI_SSID = "YourWiFiName";            // CHANGE: 2.4 GHz network
const char* WIFI_PASS = "YourWiFiPassword";        // CHANGE
const char* TZ_INFO   = "EST5EDT,M3.2.0,M11.1.0";  // CHANGE: see the table
const char* NTP_1     = "pool.ntp.org";
const char* NTP_2     = "time.nist.gov";

const int TARGET_MONTH = 12;                   // 1-12
const int TARGET_DAY   = 25;                   // 1-31
const char* TITLE      = "CHRISTMAS COUNTDOWN";
const char* DAY_LINE_1 = "Merry";
const char* DAY_LINE_2 = "Christmas!";

#define SDA_PIN 21          // CHANGE: 8 on ESP32-C3 SuperMini and S3
#define SCL_PIN 22          // CHANGE: 9 on ESP32-C3 SuperMini and S3
#define OLED_ADDR 0x3C      // try 0x3D if the screen stays blank
#define SCREEN_W 128
#define SCREEN_H 64

Adafruit_SSD1306 display(SCREEN_W, SCREEN_H, &Wire, -1);

#define NUM_FLAKES 16
int flakeX[NUM_FLAKES];
int flakeY[NUM_FLAKES];

void showMessage(const char* line1, const char* line2) {
  display.clearDisplay();
  display.setTextSize(1);
  display.setTextColor(SSD1306_WHITE);
  display.setCursor(0, 20);
  display.println(line1);
  display.println(line2);
  display.display();
}

void printCentered(const char* text, int y) {
  int16_t x1, y1;
  uint16_t w, h;
  display.getTextBounds(text, 0, y, &x1, &y1, &w, &h);
  display.setCursor((SCREEN_W - w) / 2, y);
  display.print(text);
}

void drawTree(int x, int y) {
  display.fillTriangle(x + 7, y, x + 1, y + 10, x + 13, y + 10, SSD1306_WHITE);
  display.fillTriangle(x + 7, y + 5, x - 1, y + 18, x + 15, y + 18, SSD1306_WHITE);
  display.fillRect(x + 5, y + 18, 5, 4, SSD1306_WHITE);
}

void updateSnow() {
  for (int i = 0; i < NUM_FLAKES; i++) {
    flakeY[i]++;
    if (flakeY[i] >= SCREEN_H) {
      flakeY[i] = 0;
      flakeX[i] = random(SCREEN_W);
    }
    display.drawPixel(flakeX[i], flakeY[i], SSD1306_WHITE);
  }
}

// Midnight at the start of the target day, in local time
time_t targetTime(int yearSince1900) {
  struct tm t = {};
  t.tm_year = yearSince1900;
  t.tm_mon  = TARGET_MONTH - 1;   // tm_mon counts from 0
  t.tm_mday = TARGET_DAY;
  t.tm_isdst = -1;                // let the library work out daylight saving
  return mktime(&t);
}

void drawCountdown(long secs) {
  long days = secs / 86400L;
  int hours = (secs % 86400L) / 3600;
  int mins  = (secs % 3600L) / 60;
  int s     = secs % 60;
  char buf[16];

  display.setTextColor(SSD1306_WHITE, SSD1306_BLACK);  // black box behind text
  display.setTextSize(1);
  printCentered(TITLE, 0);

  display.setTextSize(3);
  snprintf(buf, sizeof(buf), "%ld", days);
  printCentered(buf, 15);

  display.setTextSize(1);
  printCentered(days == 1 ? "day to go" : "days to go", 41);
  snprintf(buf, sizeof(buf), "%02d:%02d:%02d", hours, mins, s);
  printCentered(buf, 54);

  drawTree(4, 16);
  drawTree(109, 16);
}

void drawTheDay() {
  display.setTextColor(SSD1306_WHITE, SSD1306_BLACK);
  display.setTextSize(2);
  printCentered(DAY_LINE_1, 12);
  printCentered(DAY_LINE_2, 36);
}

void setup() {
  Serial.begin(115200);
  Wire.begin(SDA_PIN, SCL_PIN);

  if (!display.begin(SSD1306_SWITCHCAPVCC, OLED_ADDR)) {
    Serial.println("SSD1306 not found. Check wiring and address.");
    while (true) delay(1000);
  }
  showMessage("Connecting WiFi...", WIFI_SSID);

  WiFi.mode(WIFI_STA);
  WiFi.begin(WIFI_SSID, WIFI_PASS);
  uint32_t start = millis();
  while (WiFi.status() != WL_CONNECTED) {
    delay(250);
    if (millis() - start > 30000) {   // give up after 30 s and try again
      showMessage("WiFi failed.", "Restarting...");
      delay(2000);
      ESP.restart();
    }
  }
  Serial.print("WiFi OK, IP ");
  Serial.println(WiFi.localIP());

  showMessage("Getting time...", NTP_1);
  configTzTime(TZ_INFO, NTP_1, NTP_2);
  struct tm now;
  while (!getLocalTime(&now, 10000)) {
    Serial.println("Still waiting for NTP time");
  }
  Serial.println(&now, "Local time: %A %B %d %Y %H:%M:%S");

  for (int i = 0; i < NUM_FLAKES; i++) {
    flakeX[i] = random(SCREEN_W);
    flakeY[i] = random(SCREEN_H);
  }
}

void loop() {
  struct tm now;
  if (!getLocalTime(&now, 1000)) return;
  time_t nowSec = time(nullptr);

  // Dim the screen at night (10 PM to 7 AM) to save the OLED
  static int dimmed = -1;
  int wantDim = (now.tm_hour >= 22 || now.tm_hour < 7) ? 1 : 0;
  if (wantDim != dimmed) {
    display.dim(wantDim == 1);
    dimmed = wantDim;
  }

  bool isTheDay = (now.tm_mon == TARGET_MONTH - 1 && now.tm_mday == TARGET_DAY);
  time_t target = targetTime(now.tm_year);
  if (!isTheDay && nowSec > target) {
    target = targetTime(now.tm_year + 1);   // this year's date has passed
  }

  display.clearDisplay();
  updateSnow();
  if (isTheDay) {
    drawTheDay();
  } else {
    drawCountdown((long)(target - nowSec));
  }
  display.display();   // nothing shows until this is called
  delay(100);
}
What you should see
- Open Tools > Serial Monitor at 115200 baud before you upload.
- After the upload, the OLED shows "Connecting WiFi..." with your network name under it.
- The Serial Monitor prints the IP address, then a line such as "Local time: Friday November 06 2026 19:42:10".
- The countdown appears. The seconds tick down and the snow keeps falling.
If the local time in the Serial Monitor is wrong by a whole number of hours, your time zone string is wrong. Fix that first, because the countdown uses the same time.
How the countdown code works
configTzTime() sets your time zone and starts SNTP, the simple version of NTP, in the background.
getLocalTime() waits until a real date has arrived. It returns false while the clock still thinks it is
1970, so the loop in setup() simply waits for it.
The target is built with mktime(). It turns "December 25, midnight, this year" into a number of
seconds. Subtracting the current time gives the seconds left. Dividing by 86,400, the number of seconds in a day,
gives the days.
The rest becomes hours, minutes and seconds. This is much safer than counting days in each month by hand, which is where many online examples go wrong.
If the date has passed this year, the code builds next year's target instead. On the day itself,
isTheDay is true and the message screen shows. The trees are drawn with fillTriangle(),
and each snowflake is one pixel that moves down one row per frame.
Want a nicer tree or a picture of Santa's sleigh? Draw one, then turn it into an array with the
Image to Byte Array converter. Pick the Adafruit GFX drawBitmap format
and call display.drawBitmap() in place of drawTree(). The
image to byte array guide explains each
output format.
Test the Christmas screen today
You do not have to wait until December to see the "Merry Christmas!" screen. Set TARGET_MONTH and
TARGET_DAY to today's date and upload again. The message screen should appear right away.
Then set tomorrow's date. You should see 0 days and a few hours left, with "days to go" under the zero. Put the values back to 12 and 25 when you are done.
The same trick turns this into any countdown. Use month 1, day 1 for New Year, or a birthday or the first day of a
vacation. Change TITLE and the two message lines to match. Keep the title to 21 characters so it fits
across the 128 pixel screen at text size 1.
Troubleshooting the ESP32 countdown
- Problem: stuck on "Connecting WiFi". Why: the network is 5 GHz only, or the name or password is wrong. Both are case sensitive. Fix: use the 2.4 GHz network, or turn on a phone hotspot to test.
- Problem: stuck on "Getting time". Why: the network blocks NTP, which uses UDP port 123. School, office and some guest networks do this. Fix: try a phone hotspot. If that works, ask for port 123 to be opened or use the time server your network provides.
- Problem: the count is off by a few hours. Why: the time zone string is wrong or missing. Fix: copy the exact string from the table and check the time printed in the Serial Monitor.
- Problem: the time jumps by one hour in March or November. Why: you used a string without the daylight saving part, such as "EST5". Fix: use the full string with the rules after the commas.
- Problem: the screen stays black. Why: SDA and SCL are swapped, the pins in the sketch do not match the wiring, or the address is 0x3D. Fix: check the wiring and try 0x3D. The SSD1306 blank screen fixes walk through an I2C scanner.
- Problem: noise down the right edge, or the picture is shifted. Why: it is a 1.3 inch SH1106 screen, not an SSD1306. Fix: use the Adafruit SH110X library. The SH1106 vs SSD1306 guide shows how to tell them apart.
- Problem: the board keeps restarting with "Brownout detector was triggered". Why: WiFi start-up draws a short burst of current and the USB port or cable cannot supply it. Fix: use a shorter cable or a wall charger instead of a laptop hub.
Power, screen life and a case
With WiFi connected, an ESP32 draws roughly 100 mA, so run it from a USB phone charger. A small power bank works for a day or two. Batteries are covered in more detail in OLED power consumption and battery life.
OLED pixels wear a little each hour they are lit. Showing the same digits for seven weeks can leave a faint
ghost image. The sketch dims the screen from 10 PM to 7 AM, and the moving snow means no pixel is on all the time.
You can also switch the screen off at night with display.ssd1306_command(SSD1306_DISPLAYOFF).
For a finished look, print a small stand that holds the OLED at a slight tilt. A 0.96 inch module board is about 27 mm (just over 1 inch) square, with the visible screen near the top. Leave a slot at the back for the USB cable. Pair it with the Christmas shadow box lamp for a matching shelf display.
Next steps
- Make a short Christmas animation, such as a twinkling star, in the OLED Animation Maker. Play it on the screen once a day when the count drops by one.
- Add a push button that switches between Christmas and New Year countdowns.
- Learn more drawing functions in the OLED shapes guide, such as circles for ornaments.
Frequently asked questions
How does an ESP32 know the date without a clock module?
It asks an internet time server over WiFi using NTP, the Network Time Protocol. The ESP32 then keeps counting on its own and checks the server again from time to time, so no RTC module is needed.
Does the countdown need WiFi all the time?
Only at start-up to get the first time. After that it keeps counting by itself. Leaving WiFi on lets it correct small drift, so for a countdown that runs for weeks it is best to keep it connected.
How do I change the time zone?
Change the TZ_INFO string at the top of the sketch. For example, EST5EDT,M3.2.0,M11.1.0 is US Eastern, PST8PDT,M3.2.0,M11.1.0 is US Pacific and GMT0BST,M3.5.0/1,M10.5.0 is the UK. The rules after the commas handle daylight saving time for you.
Can I count down to New Year or a birthday instead?
Yes. Change TARGET_MONTH and TARGET_DAY, plus the title and the message lines. Use month 1 and day 1 for New Year. The sketch rolls over to the next year by itself after the day has passed.
Will this work with a 1.3 inch SH1106 OLED?
Not with the Adafruit SSD1306 library as it is. Most 1.3 inch modules use the SH1106 chip, so switch to the Adafruit SH110X library, use Adafruit_SH1106G, and change SSD1306_WHITE to SH110X_WHITE.
Related guides
- ESP32 OLED animation: SSD1306 wiring and code
- Fix an SSD1306 OLED blank screen
- SH1106 vs SSD1306: differences and how to tell
- Image to byte array for Arduino OLED
- Christmas shadow box lamp: 3D print a glowing wall scene
Free tools: Lithophane Maker for flat, curved, heart, round and cylinder lamp lithophanes, the Shadow Box Lamp Generator for wall shadow lamps, Text to STL for names and keychains, and 3MF to Web to show your prints on a website. See all tools.