Shadow lamp generator: settings and fixes for clean shadows
A shadow lamp generator turns any picture into a 3D printable box that throws that picture onto your wall as a shadow. When it works, it looks great. When it doesn't, you get a blurry blob, a missing head, or light leaking out of every seam. This guide explains what each setting in the free shadow lamp generator does, which numbers to start with, and how to fix the 12 problems people run into most.
Most pages on this topic show finished models. Few of them tell you what to do when your own picture comes out wrong. That is the gap this page fills. If you have never made one, read the step-by-step guide to making a shadow lamp from any picture first, then come back here when you want better results.
Quick answer. Most bad shadow lamps come from the picture, not the printer. Use a bold one-color shape and check the wall preview before you download. Lower Figure size until "Figure lost above panel top" is close to 0%. Print the walls in dark, opaque PLA or PETG with one small warm white LED.
How a shadow lamp generator turns a picture into a lamp
The idea is simple. One LED sits on a short tube in the middle of a box. The walls of the box are thin panels with your picture cut out of them as holes. Light only gets out through the holes, and the shape of those holes lands on your wall as a shadow picture.
The shadow is much bigger than the box, and the size depends on where each hole sits. A hole near the top edge of a panel throws its piece of the picture farther out than a hole near the bottom. The closer the LED is to the tops of the panels, the bigger the whole shadow gets. The generator does this math for you. You tell it how wide you want the shadow, and it raises the LED and panels until the numbers work.
Two more things happen behind the scenes. First, any piece of your picture that would float free, like the inside of an eye, is joined to the rest of the panel with a thin strut. Second, pieces that are too small to print are dropped. Knowing this explains most of the odd results below.
What you need
- A 3D printer with a bed of at least 180 mm (about 7 inches). The generator checks your bed size before you download.
- Dark, opaque filament. PLA or PETG in black or dark gray blocks light best. A 1 kg spool costs roughly $15 to $25 in the US.
- One small warm white LED. A 5 mm LED works. The generator's guide uses a 56 ohm resistor on a 3.7 V LiPo battery, which draws about 12 to 15 mA. On a 5 V USB supply, a resistor around 150 ohms is closer. Check your LED's rated voltage first.
- A picture. A bold, one-color shape in PNG, JPG, WEBP or SVG.
- The generator. Open the Shadow Box Lamp Generator. It is free, with no sign-up and no watermark.
The settings, and what to start with
You do not need to touch every slider. The defaults give a working lamp. This table shows what each one does and when it is worth changing. All values come straight from the tool.
| Setting | Default | Range | Change it when |
|---|---|---|---|
| Figure size | 100% | 40 to 110% | Parts of the figure are lost at the top. Lower it. |
| Shadow width | from the picture | 50 to 2,500 mm | You want a specific size on the wall. |
| Inner width | 110 mm (4.3 in) | 40 to 200 mm | You want a bigger or smaller box. |
| Inner height | 140 mm (5.5 in) | 40 to 220 mm | Same, for rectangle and diamond boxes. |
| Panel max height | 48 mm | 20 to 200 mm | You need the shadow to reach farther. |
| LED height | 62 mm | 30 to 220 mm | You want a bigger or smaller shadow. |
| Panel thickness | 1.6 mm | 1.2 to 3 mm | Light shows through, or panels feel weak. |
| Floor thickness | 3 mm | 2 to 25 mm | Rarely. 3 mm is fine for most lamps. |
| Strut width | 0.8 mm | 0.6 to 3 mm | Struts snap, or you see them in the shadow. |
| Resolution | Fine 0.15 mm | Draft 0.3, Good 0.2, Fine 0.15, Ultra 0.1 | Use Draft to test, Fine or Ultra for the final file. |
| Wall fit | Press-fit (0.1 mm gap) | tight 0.05, loose 0.2, or glue | Walls are too tight or too loose in the floor slots. |
| Threshold (converter) | 41 | 3 to 97 | The converted shape is too fat or too thin. |
| Smoothing (converter) | 4 | 0 to 4 | Sharp corners or text look rounded. |
| Remove specks (converter) | 300 | 0 to 300 | Small details vanish from the shape. |
There are also two box presets. Standard is the 110 by 140 mm default. Mini is a 55 by 70 mm box (about 2.2 by 2.8 inches) that throws a shadow roughly 20 to 25 cm (8 to 10 inches) wide. Mini works well for desk and gift lamps, but only simple, bold shapes print well at that size.
A five-minute check before you press download
- Look at the converted shape. It should be one clear silhouette, not a pile of specks.
- Open the wall preview. Dark areas are shadow, and amber areas are places where light would leak.
- Read the stats. "Figure lost above panel top" should be near 0%.
- Check "Floating detail". Those pieces are joined by struts. Dropped pieces were too small to print.
- Pick your bed size in the download window. The tool tells you if the parts fit.
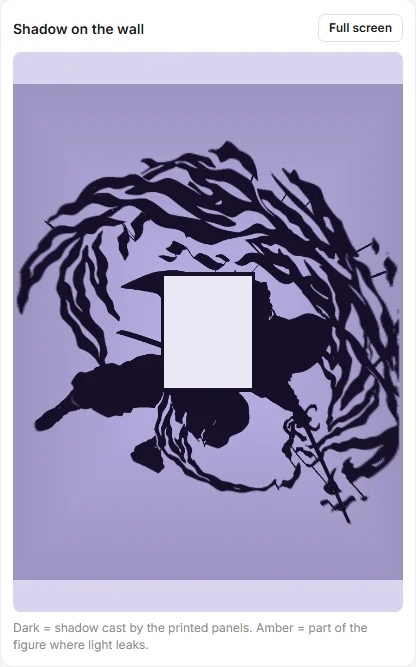
If all five look good, you are ready. If not, find your problem below. Each one follows the same pattern: what you see, why it happens, and how to fix it.
12 shadow lamp problems and how to fix each one
1. The shadow looks blurry or soft at the edges
Why: A shadow is only sharp when the light comes from a tiny point. A large or very bright LED, or a lamp that sits far from the wall, makes a soft edge.
Fix: Use one small LED chip, not a big bulb. Keep the lamp close to the wall and dim the room lights. The guide to projecting shadows on a wall has a size and blur calculator that shows how distance changes sharpness.
2. The shadow is too small, or too big, for my wall
Why: The shadow size comes from the LED height and the panel height together.
Fix: Type the width you want into Shadow width, in millimeters. 500 mm is about 20 inches, and 1,000 mm is about 39 inches. If the box cannot reach that size, the tool lowers the LED toward the panel tops first, then raises the panels, and tells you the heights it used. For a bigger shadow without a bigger box, lower the LED. For a smaller one, raise it.
3. Part of the figure is missing at the top or edges
Why: Figure size above 100% pushes the outer parts of the picture past the tops of the panels, so there is nothing to cut them into.
Fix: Lower Figure size until "Figure lost above panel top" is close to 0%. If you need the figure large, raise Panel max height instead, or type a smaller Shadow width.
4. The wall preview shows amber light-leak areas
Why: Amber marks parts of the figure that no panel covers, so light would spill out. They are most common at the outer edge.
Fix: Lower Figure size, or move the box centre with Box centre X and Y. Leaks at the outer edge usually disappear when you shrink the figure a little.
5. After upload, the shape is a blob or the wrong shape
Why: The converter turns every pixel into shape or background using a threshold. A photo with soft shading has no clean split.
Fix: Turn on Automatic threshold first. If the shape is too fat, raise Threshold to keep only the darkest areas. If it is too thin, lower it to include lighter grays. Best of all, use a one-color picture. A black shape on a white background converts cleanest.
6. The shadow is inverted: the light parts became the figure
Why: Your picture has a light figure on a dark background, so the converter traced the background.
Fix: Tick "Use the background as the figure" in the main settings, or tick Invert in the converter. The wall preview updates right away, so you can see which one you need.
7. Text or the figure is backwards
Why: You are reading the shadow from the other side of the light, or the original art faces the other way.
Fix: Tick "Mirror horizontally". Always check names and words in the wall preview before you print, because a backwards word is easy to miss on the flat file.
8. Small details disappear
Why: The generator drops any floating piece that is too small to print. The converter's "Remove specks" slider also deletes small islands, and its default of 300 is the maximum.
Fix: Lower Remove specks to keep fine details, and raise Resolution to Fine or Ultra. Also make the details bigger in your picture, or type a larger Shadow width. A detail that is under about half a millimeter will not print on a 0.4 mm nozzle, whatever the settings.
9. The thin struts show in the shadow or snap
Why: Struts are the thin bridges that hold floating parts, like the inside of an O, to the rest of the panel. Thin struts hide well but are weak.
Fix: If they snap when you handle the wall, raise Strut width from the 0.8 mm default toward 1.2 mm. If they look too heavy in the shadow, go back down. Redrawing the picture with fewer floating islands is the cleanest fix.
10. The walls will not push into the floor slots
Why: Every printer makes slots and holes a little differently. The default Press-fit leaves a 0.1 mm gap on each side.
Fix: If the walls are too loose, pick the tight setting (0.05 mm) and print again. If they will not go in, pick loose (0.2 mm). If you would rather glue, choose Glue, which gives a floor with a low rim and no slots. Each wall has its number cut into the bottom edge, and the same number is raised beside its slot on the floor.
11. Light shows through the plastic or leaks at the seams
Why: Light slips through thin or light-colored plastic, and through any gap where two parts meet.
Fix: Print in black or dark gray, not white or a pale color. Raise Panel thickness from 1.6 mm toward 2 mm if light still glows through, and use 2 or 3 wall loops in the slicer. For a seam that leaks, stick a thin strip of opaque tape on the inside of the joint.
12. There are two shadows, or a bright round spot in the middle
Why: Some LEDs have two emitters side by side, so every edge is drawn twice. A big bright LED can also leave a round hot spot on the wall.
Fix: Use a single-chip LED, and keep it small. A frosted tealight-style LED spreads light too widely, so choose a clear one if the picture looks muddy.
Shadow lamp maker, creator, designer or software: which do you need?
People use many names for the same idea, such as shadow lamp maker, shadow lamp creator, shadow lamp designer and shadow lamp software. They are not all the same kind of tool. It helps to know the difference before you pick one.
- A shadow lamp template or ready STL is one fixed picture. You can print it as is, but you cannot change the artwork.
- CAD software, such as a general 3D modeling program, lets you draw the panels yourself. It gives total control, but you have to cut every hole by hand and add every strut yourself.
- A shadow lamp generator converts any picture you upload into the panels, struts and box for you, and shows a wall preview first. This is the fastest way to a custom lamp, and it is what the free Shadow Box Lamp Generator does.
If you are still deciding between this and a photo gift, the comparison of a shadow lamp and a lithophane shows which one suits your picture.
Print settings that help
- Layer height: 0.2 mm is a good start. Use 0.16 mm if you want cleaner cut edges.
- Walls: 2 or 3 wall loops, and 15 to 20% infill. The panels are thin, so the walls matter more than the infill.
- Orientation: Print each wall flat, with the stencil face up. A flat panel needs no supports. The generator's Print layout view shows how the parts lie.
- Supports: If you print the all-in-one version, check the slicer preview. Turn on tree supports only where it flags an overhang.
- Bed size: Choose your bed in the download window. If the parts do not fit, pick Separate parts and print one wall at a time.
- Quick test: Use Draft 0.3 mm and a smaller Inner width to test a new picture. Switch to Fine for the final print.
Keep the LED cool and safe
PLA starts to soften at about 60 to 65 °C (140 to 149 °F), according to its glass transition range. A low-power LED stays far below that, so it is fine. A hot bulb is not. Never use an incandescent or halogen bulb, or a real flame, inside a 3D printed lamp. The heat can warp the plastic and it is a fire risk.
A 5 mm LED on a battery or a USB cable is the safe choice. If you want a cordless lamp, the generator has a rechargeable battery option that turns the floor into a tray for a TP4056 USB-C charger board, a slide switch and a flat LiPo cell. The setting names the largest cell that fits your box. The Christmas shadow box lamp guide shows a full build with that option.
Pictures that make a good shadow
- One solid shape. Thick limbs, a clear pose, and plenty of empty space around the figure.
- Gaps of at least 2 to 3 mm in the final print, so light gets through and the plastic holds up.
- Simple names and words in a thick, rounded font. Thin script fonts break into floating bits.
- Your own art, or art you may use. Keep character lamps for personal use, and do not sell prints of other people's artwork.
Next steps
- Open the free shadow lamp generator and try the sample swordsman, which loads on its own.
- Read the full guide to making a shadow lamp for the step-by-step version.
- Make a name or logo plate with Text to STL to hang beside the lamp.
Frequently asked questions
Is there a free shadow lamp generator?
Yes. The Shadow Box Lamp Generator on this site is free. You can upload a picture, check the wall preview, and download the STL files with no sign-up and no watermark. You only pay if you ask us to print a lamp for you.
Why is the shadow from my 3D printed shadow lamp blurry?
The light source is too big or too bright, or the lamp is too far from the wall. Use one small warm white LED chip, keep the lamp close to the wall, and dim the room. A bare dual-emitter LED can also throw a doubled edge.
How do I make the shadow bigger?
Type a larger Shadow width in millimeters. The generator raises the LED and the panels by itself to reach it. You can also lower the LED toward the panel tops, because the closer the LED is to the panel tops, the bigger the shadow.
What filament and layer height work best for a shadow lamp?
Dark, opaque PLA or PETG at 0.2 mm layers is a good start. Dark colors block light best. Use 2 or 3 walls so the thin panels stay solid, and print each wall flat.
Can I use any picture in a shadow lamp generator?
Any picture can be converted, but only bold one-color shapes make a good shadow. Photos with soft shading turn into blobs. Use art you drew yourself or have the right to use, and keep character lamps for personal use.
Related guides
- How to make a shadow lamp from any picture
- How to project shadows on a wall: light, distance, sharpness
- Shadow lamp vs lithophane: which should you 3D print?
- Christmas shadow box lamp: 3D print a glowing wall scene
Free tools: Lithophane Maker for flat, curved, heart, round and cylinder lamp lithophanes, the Shadow Box Lamp Generator for wall shadow lamps, Text to STL for names and keychains, and 3MF to Web to show your prints on a website. See all tools.