Arduino buzzer songs code: play any song on a piezo buzzer
This page gives you Arduino buzzer songs code that you can copy, paste and hear in five minutes. A small piezo buzzer and two wires are enough. You will wire the buzzer, upload a tested Happy Birthday sketch, make it play when a button is pressed, and then learn how to turn any melody into code, either by hand or with a free tool that writes the sketch for you.
Buzzer songs are one of the most searched beginner Arduino projects, and for a good reason. They teach arrays, loops, timing and frequencies, and the result makes people smile. The same code also adds sound to bigger builds, such as a game, a clock alarm or a desk robot.
Short version. Use a passive buzzer. Connect its plus leg to pin 8 (GPIO 25 on an ESP32) and
the other leg to GND. Store the song as pairs of note frequency and length, then play each note with
tone(pin, frequency, duration) and wait with delay(). No library is needed, and the same
sketch runs on Arduino Uno, Nano, Mega, ESP32, ESP8266 and Raspberry Pi Pico.
How an Arduino plays songs on a buzzer
A piezo buzzer has a thin metal disc with a crystal layer on it. When the voltage on it flips on and off, the disc bends back and forth and pushes the air. If it flips 440 times a second, you hear the note A4. If it flips 523 times a second, you hear C5. So a melody is just a list of frequencies, each held for a certain time.
The Arduino tone() function does the flipping for you. It makes a square wave on one pin at the frequency
you ask for. The official tone() reference
lists the three forms:
tone(pin, frequency)starts a note that keeps going until you callnoTone(pin).tone(pin, frequency, duration)plays a note for a number of milliseconds and then stops by itself.noTone(pin)stops the sound.
Two limits matter for songs. First, tone() plays one note at a time, so a buzzer song is a single melody
line with no chords. Second, tone() with a duration does not wait. It starts the note and returns at once,
so your code must call delay() for the note's length before the next note.
What you need
- A board: Arduino Uno or Nano is the easiest. An ESP32, ESP8266 or Raspberry Pi Pico works the same way.
- A passive buzzer: a bare 12 mm piezo or a 3-pin "passive buzzer module". About $1.
- Two jumper wires and a breadboard.
- Optional: a push button for the button version, and a 100 ohm resistor if your buzzer is the magnetic type (more on that below).
Passive or active buzzer? Check before you start
This is the mistake that stops most first buzzer projects. An active buzzer has its own small oscillator inside. Give it power and it beeps at one fixed pitch, usually around 2 to 3 kHz, whatever the code sends. It cannot play a melody. A passive buzzer has no oscillator, so it plays exactly the frequency your pin makes.
| Check | Passive buzzer (plays songs) | Active buzzer (beeps only) |
|---|---|---|
| Touch 5 V and GND for a moment | One click, then silence | A steady beep |
| Bottom side | Often open, you can see a green board | Usually sealed with black epoxy |
| Height (12 mm round type) | Often about 8 mm | Often about 9.5 mm, with a sticker on top |
| Module label | "Passive" or KY-006 | "Active" or KY-012 |
Wiring the buzzer to Arduino, ESP32, ESP8266 and Pico
A buzzer needs just two connections: the signal pin and ground. On a 3-pin module, the middle pin is usually VCC. Connect it to 5 V (or 3.3 V on 3.3 V boards), the S pin to your signal pin and the minus pin to GND.
| Board | Buzzer + (signal) | Buzzer − | In the sketch |
|---|---|---|---|
| Arduino Uno / Nano | D8 | GND | BUZZER_PIN = 8 |
| Arduino Mega 2560 | D8 | GND | BUZZER_PIN = 8 |
| ESP32 DevKit | GPIO 25 | GND | BUZZER_PIN = 25 |
| ESP8266 NodeMCU | D5 (GPIO 14) | GND | BUZZER_PIN = 14 |
| Raspberry Pi Pico | GP15 | GND | BUZZER_PIN = 15 |
On an Uno or Nano, tone() uses hardware Timer 2. While a note plays, analogWrite() on pins 3
and 11 stops working, so keep LEDs you fade off those pins. Small piezo discs draw only a few milliamps and can connect
straight to a pin. The black "magnetic" buzzers with a coil inside can pull 30 mA or more, so add a 100 ohm resistor in
series or drive them through an NPN transistor such as a 2N2222.
Arduino buzzer songs code: Happy Birthday sketch
Here is a complete sketch that plays Happy Birthday once when the board starts. I compiled it for an Arduino Uno, an ESP32 DevKit and an ESP8266 NodeMCU without errors. It uses only built-in functions, so there is nothing to install.
// Happy Birthday on a passive piezo buzzer
// Works on Arduino Uno, Nano, Mega, ESP32, ESP8266 and Raspberry Pi Pico

const int BUZZER_PIN = 8;   // change to your pin (for example 25 on an ESP32)
const int TEMPO = 120;      // beats per minute: higher = faster

// Note frequencies in Hz (4 = the octave with middle C)
#define NOTE_G4 392
#define NOTE_A4 440
#define NOTE_B4 494
#define NOTE_C5 523
#define NOTE_D5 587
#define NOTE_E5 659
#define NOTE_F5 698
#define NOTE_G5 784

// The tune: one note, then its length in sixteenth notes (4 = one beat)
const int melody[] = {
  NOTE_G4, 3, NOTE_G4, 1, NOTE_A4, 4, NOTE_G4, 4, NOTE_C5, 4, NOTE_B4, 8,
  NOTE_G4, 3, NOTE_G4, 1, NOTE_A4, 4, NOTE_G4, 4, NOTE_D5, 4, NOTE_C5, 8,
  NOTE_G4, 3, NOTE_G4, 1, NOTE_G5, 4, NOTE_E5, 4, NOTE_C5, 4, NOTE_B4, 4, NOTE_A4, 8,
  NOTE_F5, 3, NOTE_F5, 1, NOTE_E5, 4, NOTE_C5, 4, NOTE_D5, 4, NOTE_C5, 12
};
const int NOTES = sizeof(melody) / sizeof(melody[0]) / 2;

void playSong() {
  const unsigned long sixteenth = 60000UL / TEMPO / 4;  // length of one sixteenth note in ms
  for (int i = 0; i < NOTES; i++) {
    int freq = melody[i * 2];
    unsigned long len = melody[i * 2 + 1] * sixteenth;
    tone(BUZZER_PIN, freq, len * 9 / 10);  // sound for 90% of the note...
    delay(len);                            // ...so a short gap keeps repeated notes apart
  }
  noTone(BUZZER_PIN);
}

void setup() {
  pinMode(BUZZER_PIN, OUTPUT);
  playSong();  // play once at power-on
}

void loop() {
  // empty: the song played once in setup()
}
Upload it and you should hear the familiar four lines, about 13 seconds in total. Press the reset button to hear it again. If you hear only clicks, the buzzer is active or on the wrong pin. See the troubleshooting list below.
How the song code works, line by line
- The NOTE_ lines give each note a name and its frequency in hertz. A4 is 440 Hz, and each octave up doubles the number, so A5 is 880 Hz.
- The melody array stores pairs: a note, then how long it lasts in sixteenth notes. 4 is one beat, 8 is two beats, and 3 + 1 is the "dotted" rhythm at the start of each line.
- TEMPO sets the speed. At 120 beats per minute one beat is 500 ms, so a sixteenth note is 125 ms.
- tone(..., len * 9 / 10) plays each note for 90% of its length. Without that small gap, two equal notes in a row (like the G G at the start) blur into one long note.
- delay(len) waits for the full note before the loop moves on, because
tone()does not wait by itself.
The official toneMelody example does the same job with two separate arrays, one for notes and one for durations. Keeping each note next to its length, as above, makes long songs much easier to edit.
Play the song when a button is pressed
Most projects should not play a song every time they power up. Wire a push button between pin 2 and GND, then use
this setup() and loop() in place of the ones above. INPUT_PULLUP turns on the
resistor inside the chip, so no extra resistor is needed.
const int BUTTON_PIN = 2;  // push button between this pin and GND

void setup() {
  pinMode(BUZZER_PIN, OUTPUT);
  pinMode(BUTTON_PIN, INPUT_PULLUP);
}

void loop() {
  if (digitalRead(BUTTON_PIN) == LOW) {          // button pressed
    delay(30);                                   // ignore switch bounce
    if (digitalRead(BUTTON_PIN) == LOW) {
      playSong();
      while (digitalRead(BUTTON_PIN) == LOW) {   // wait for release, so one press = one song
        delay(10);
      }
    }
  }
}
The same idea works with a PIR motion sensor, an IR sensor or a TTP223 touch pad. Those modules give a HIGH signal
when triggered, so check for HIGH instead of LOW and add a pause after the song so it does
not repeat at once. The Arduino OLED menu with buttons guide
has more about button wiring and debouncing.
Make any buzzer song without writing notes by hand
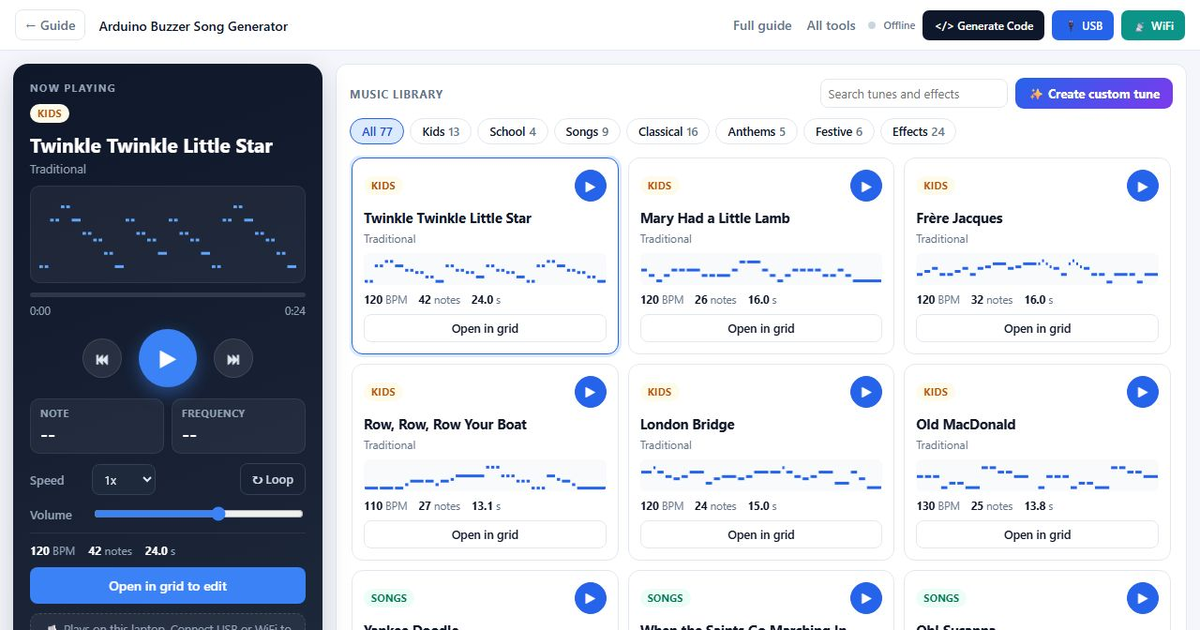
Typing notes is fine for one short tune, but it gets slow for a long song, and it is easy to get one note wrong. I made the free Arduino Buzzer Song Generator to do this part. It runs in the browser, needs no sign-up, and writes a complete sketch like the one above for the song you choose.
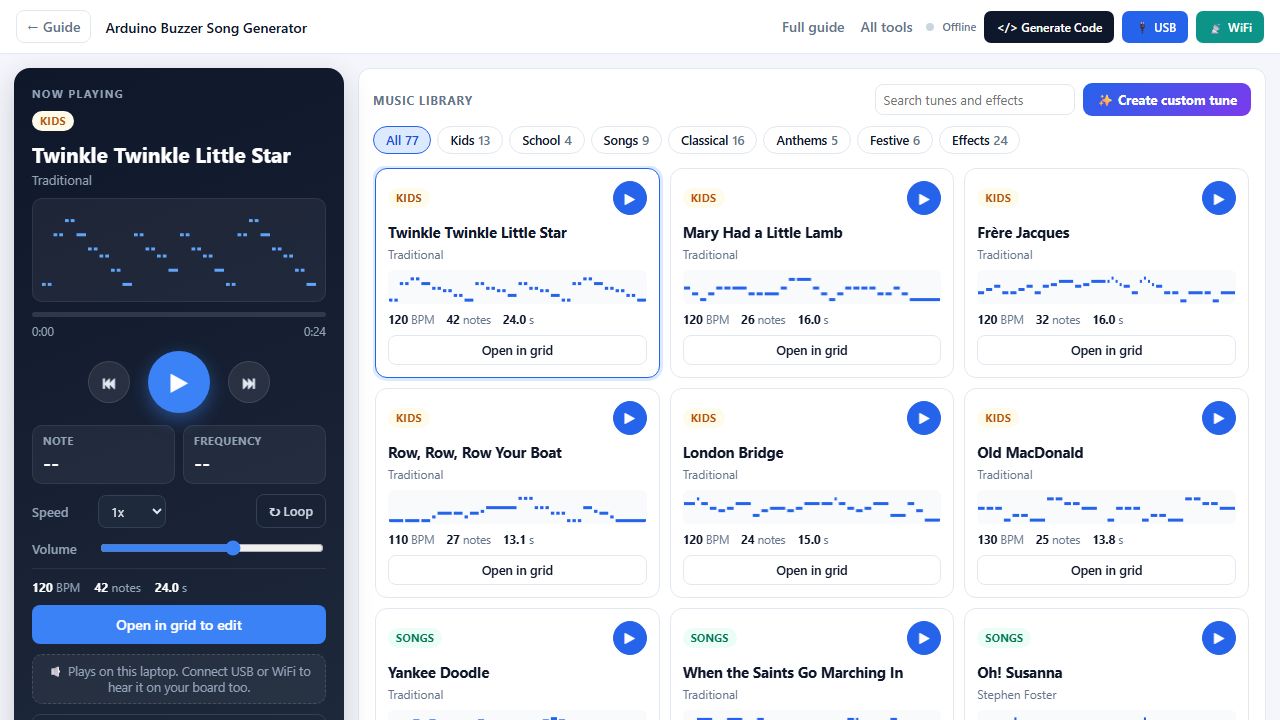
The music library has 53 public-domain songs in six tabs, plus 24 sound effects. Click a card to hear it in the browser first. A few you can pick:
| Tab | Examples |
|---|---|
| Kids | Twinkle Twinkle Little Star, Mary Had a Little Lamb, Old MacDonald, The Wheels on the Bus, Itsy Bitsy Spider |
| School | Kumbaya, Oh My Darling Clementine, She'll Be Coming Round the Mountain |
| Songs | Amazing Grace, Greensleeves, When the Saints Go Marching In, Yankee Doodle, Korobeiniki |
| Classical | Für Elise (opening), Ode to Joy, Canon in D, Turkish March, In the Hall of the Mountain King |
| Anthems | The Star-Spangled Banner, God Save the King, Jana Gana Mana, La Marseillaise (opening) |
| Festive | Happy Birthday, Jingle Bells, Silent Night, Deck the Halls, We Wish You a Merry Christmas |
Get the code for your board
Press Generate Code, pick your board and buzzer pin, and choose when the song should play: when the
board turns on, repeat forever, when a button is pressed, when a sensor triggers, or only when your own code calls
playTune(). The wiring hint under the choosers changes for each board.
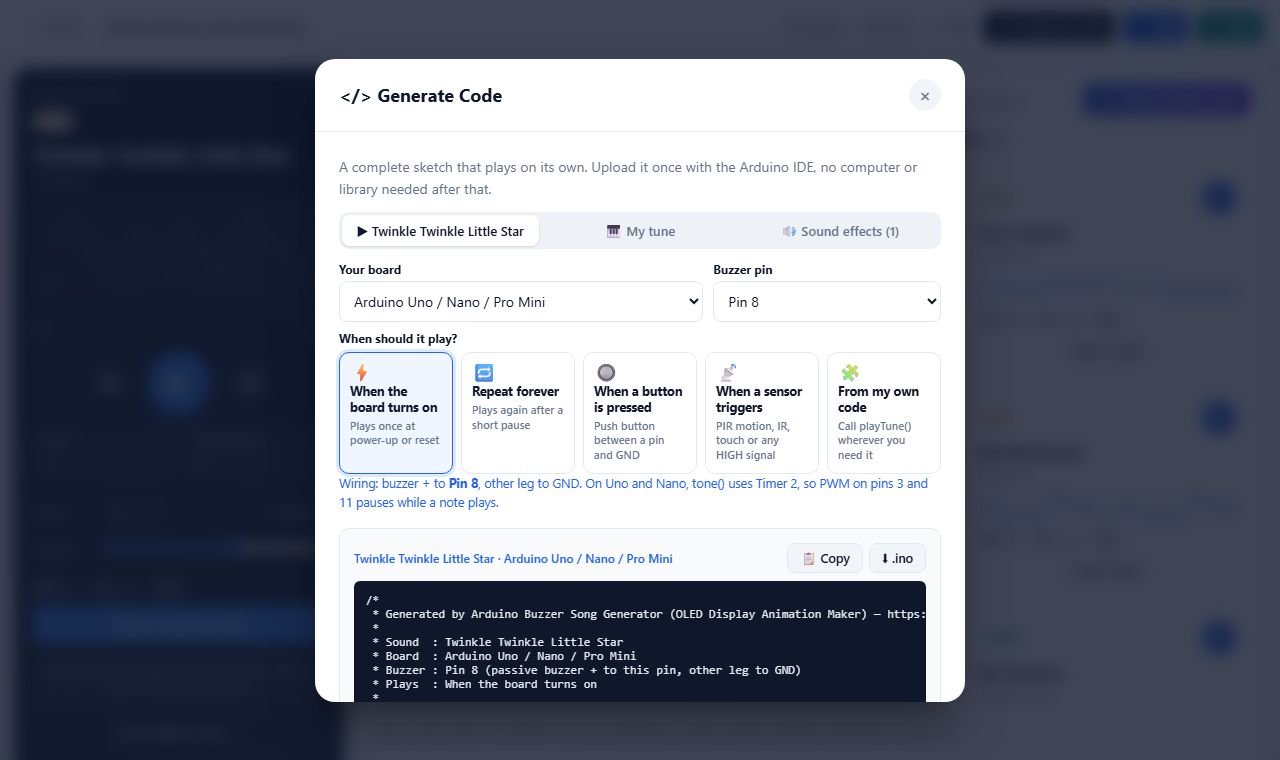
The generated sketch stores the song in flash memory with PROGMEM, so even long songs leave the Uno's
2 KB of RAM free for the rest of your project. It covers 13 board families, including Uno R4, Nano Every, Leonardo,
ESP32-C3 and -S3, Pico and STM32.
Draw your own melody on a note grid
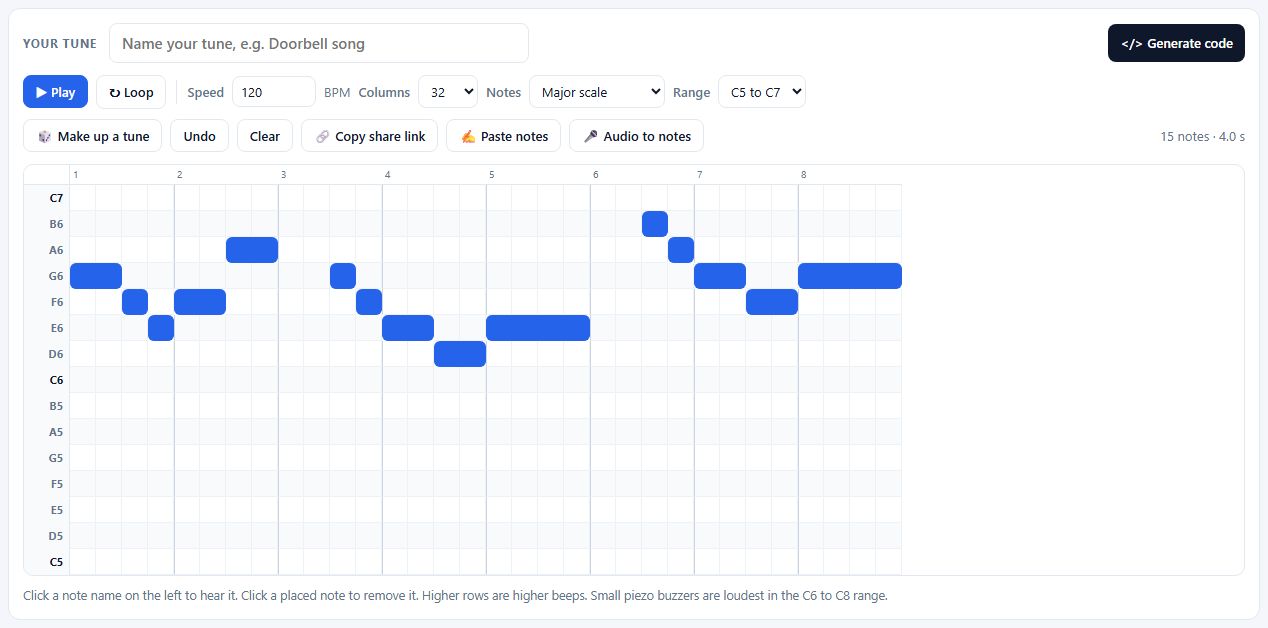
For an original tune, open the note grid. Rows are notes and columns are steps in time. Click a square to place a note and drag right to hold it. You can lock the grid to a pentatonic or major scale so every note sounds good together, which is a nice way for kids to compose their first song.
Paste notes or sargam
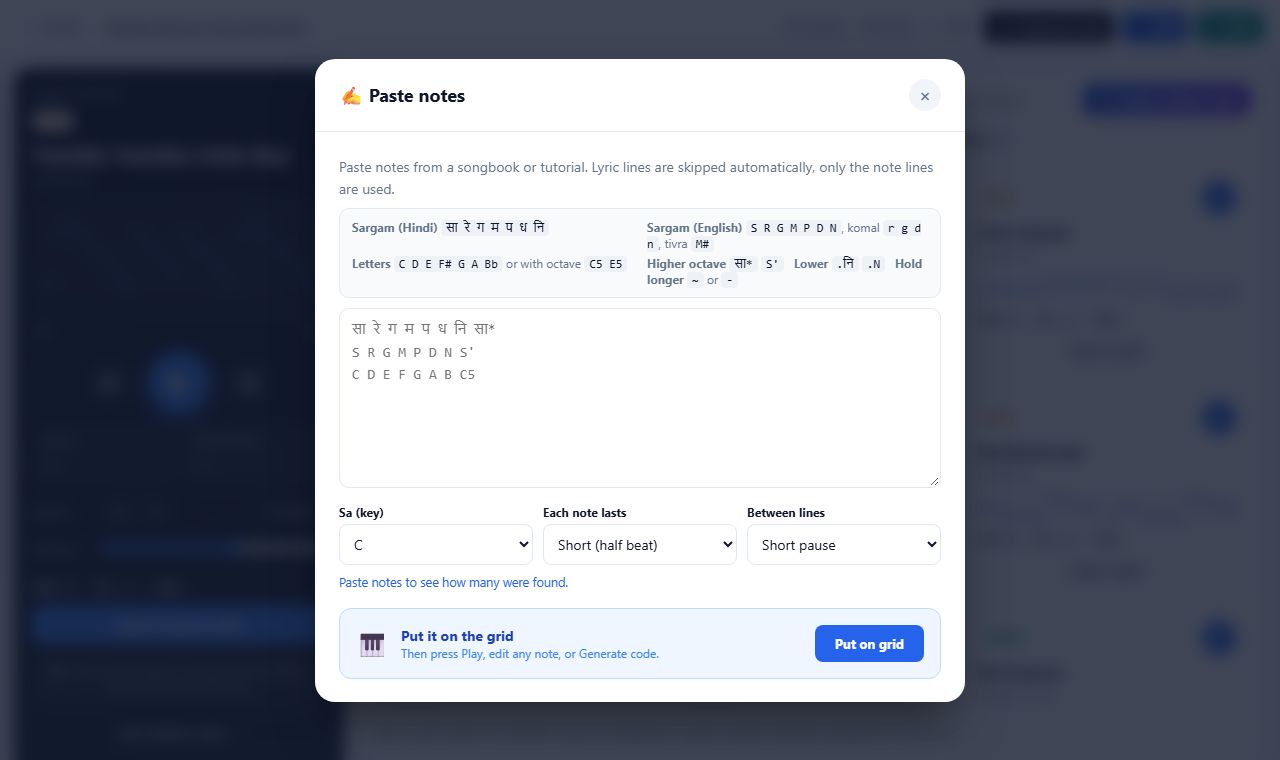
Found a song written as letter notes, like C D E C? Use
Paste notes. It also reads Indian sargam in
Hindi (सा रे ग म प ध नि) or English (S R G M P D N), and it skips lines that contain lyrics, so you can paste a full
notation page as it is.
Turn an MP3 or humming into buzzer notes
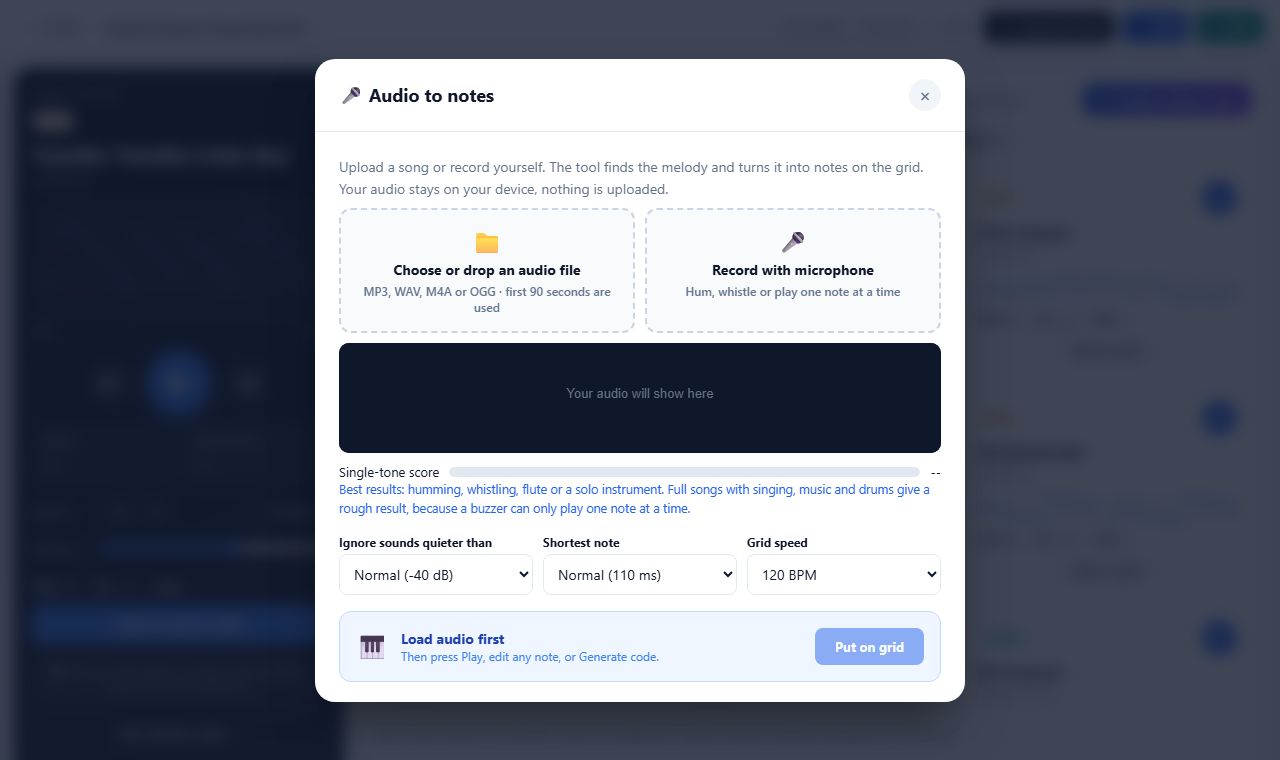
Audio to notes listens to an MP3, WAV or M4A file, or to a microphone recording, and finds the main melody. The audio stays on your device. It works best with a single clear voice or instrument, such as humming, whistling or a solo flute. A full band mix gives messy results, because a buzzer can only play one note at a time.
Add sound effects: coin, laser, alarm
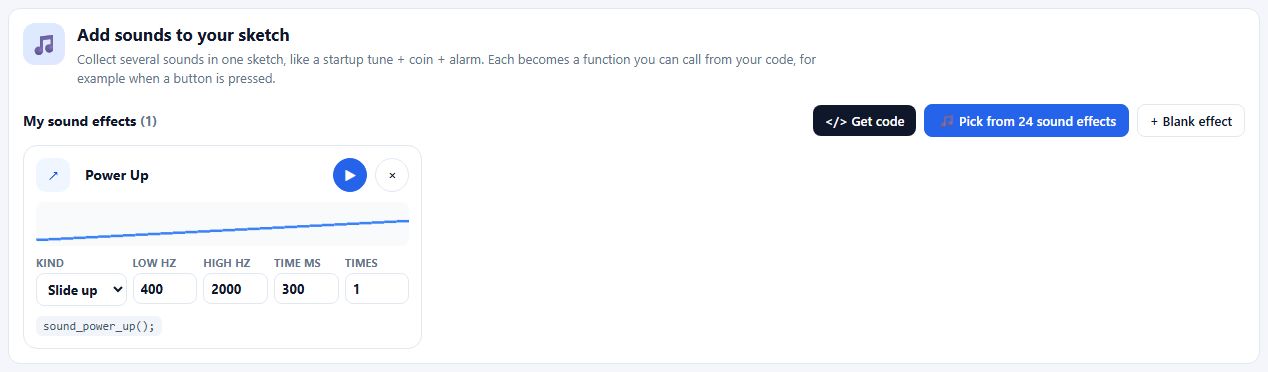
Songs are not the only thing a buzzer is good for. Short effects make a project feel finished: a coin sound when a
player scores, a rising "power up" at start-up, a beep pattern for an alarm. The library has 24 of them, including
Coin, Laser, Siren, Alarm, Level complete and Game over. Each one becomes its own function in the sketch, so you call
sound_coin() wherever you need it.
These work well in the one-button Arduino OLED game: play a jump sound when the player jumps and Game over when they hit a block.
Play songs on the board live over USB or WiFi
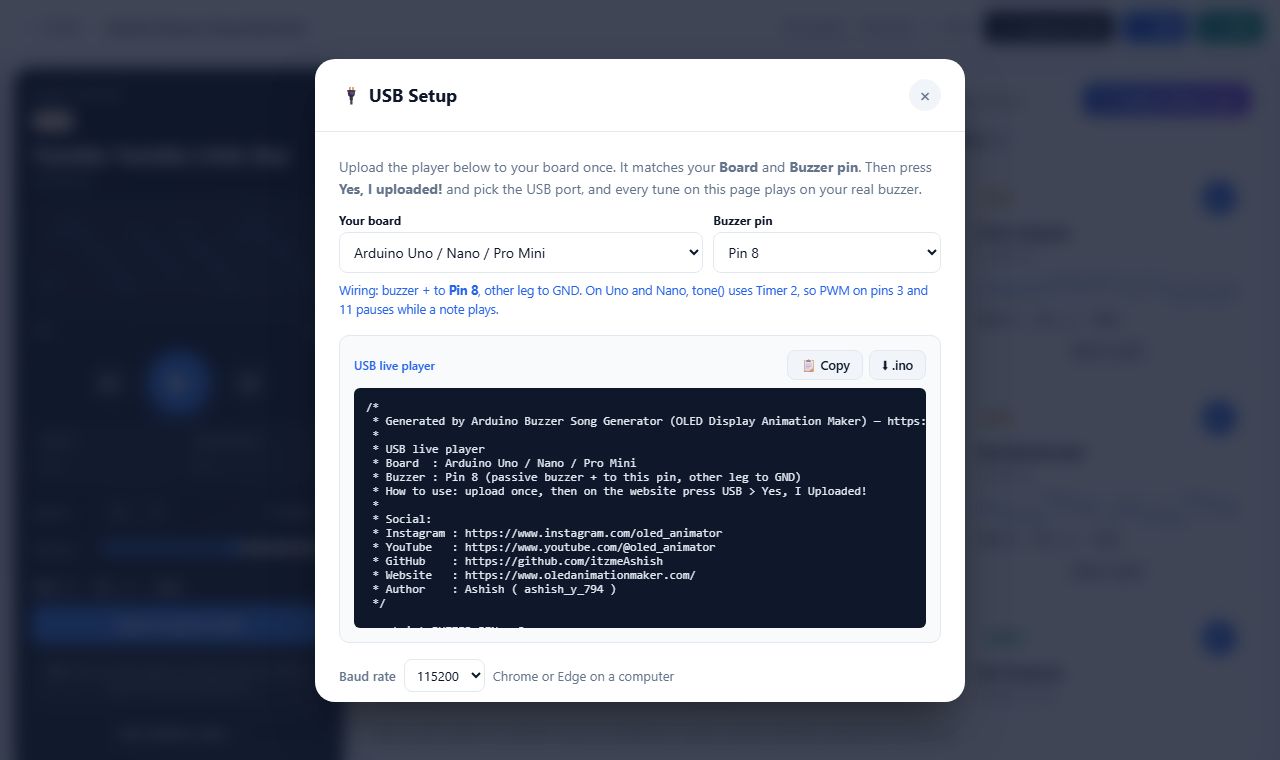
Uploading a new sketch for every song you want to try is slow. The tool has a live player instead. Upload the small USB player sketch once, press USB in Chrome or Edge, and every song you play in the browser also plays on the real buzzer. ESP8266 and ESP32 boards can do the same over WiFi.
Notes for ESP32, ESP8266 and Pico
- ESP32: the Arduino ESP32 core has supported
tone()since version 2.0.0. Update the board package in the Boards Manager if you get "tone was not declared". Avoid input-only pins 34 to 39. - ESP8266:
tone()works on any GPIO except GPIO 16. Use D5 (GPIO 14) or D6 (GPIO 12). The 3.3 V output is quieter than an Uno's 5 V. - Raspberry Pi Pico: with the Earle Philhower Arduino core,
tone()works on any GP pin. - Long songs on an Uno: a 300-note song in a plain
intarray uses 1.2 KB of the Uno's 2 KB RAM. AddPROGMEMand read it withpgm_read_word(), as the generator does.
The ESP32 is a good fit if the song is part of a bigger build. The ESP32 OLED clock could play a melody on the hour, and the ESP32 Christmas countdown can play Jingle Bells when it reaches zero.
Test buzzer songs in Tinkercad first
No buzzer yet? Tinkercad Circuits runs the
sketch in your browser. Add an Arduino Uno and a Piezo, connect the piezo's plus side to pin 8 and the other side to
GND, paste the code into the Text editor and press Start Simulation. You will hear the song through your speakers.
Tinkercad supports tone(), arrays and PROGMEM, so code from the generator works there too.
Troubleshooting Arduino buzzer songs
- Problem: one steady beep, no melody. Why: it is an active buzzer. Fix: use a passive buzzer. Do the 5 V touch test from the table above.
- Problem: only a click at start-up, then silence. Why: the signal is on a different pin from BUZZER_PIN, or the buzzer is wired to 5 V and the pin. Fix: plus leg to the signal pin, minus leg to GND, and match the number in the sketch.
- Problem: the song is very quiet. Why: small piezos are quiet below about 1 kHz, and 3.3 V boards give less swing. Fix: move the song up an octave (double every frequency), or use a transistor driver.
- Problem: notes run together. Why: the note plays for its full length with no gap. Fix: keep the 90% trick,
tone(pin, f, len * 9 / 10), thendelay(len). - Problem: the song plays far too fast. Why: the code calls
tone()without adelay(), so each note replaces the last one at once. Fix: wait for the note length after everytone(). - Problem: an LED on pin 3 or 11 stops fading during the song (Uno). Why:
tone()borrows Timer 2. Fix: move the LED to pin 5, 6, 9 or 10. - Problem: the board resets or freezes on a long song. Why: the song array filled the Uno's RAM. Fix: store it with
PROGMEM.
Project ideas with buzzer songs
- A birthday card box that plays Happy Birthday when the lid opens (a magnet and a reed switch as the "button").
- A door chime with a PIR sensor that plays a different song each time.
- Sound for the ESP32 desk robot with OLED eyes: a happy chirp when you touch it.
- A classroom quiz buzzer: one button per team, each with its own short tune.
- A kitchen timer that plays Level complete when the time is up.
Frequently asked questions
How do you play a song on a buzzer with Arduino?
Wire a passive buzzer between a digital pin and GND, store the song as a list of note frequencies and lengths, and play each note with tone(pin, frequency, duration) followed by delay(). No library is needed.
Why does my buzzer only beep one tone?
It is an active buzzer. It has its own oscillator and always beeps at one pitch, usually around 2 to 3 kHz. Melodies need a passive buzzer, which plays whatever frequency the pin sends.
Can tone() play two notes at the same time?
No. tone() makes one square wave on one pin at a time. A buzzer song is a single melody line, so chords are left out. You can fake a chord by playing its notes very quickly one after another.
Does the ESP32 support the Arduino tone() function?
Yes. The Arduino ESP32 core has supported tone() and noTone() since version 2.0.0, so the same sketch works on an ESP32, ESP32-C3 and ESP32-S3. Use a normal output pin such as GPIO 25.
How do I make my Arduino buzzer louder?
Move the song higher, because small piezo buzzers are loudest between about 2 and 4 kHz and quiet below 1 kHz. Use a 5 V board, remove large series resistors, or drive a bigger buzzer through an NPN transistor.
Can I test Arduino buzzer songs in Tinkercad?
Yes. Add an Arduino Uno and a Piezo in Tinkercad Circuits, wire the piezo to pin 8 and GND, and paste the sketch. Tinkercad supports tone(), noTone(), delay() and arrays.
Related guides
- Arduino Buzzer Song Generator: full guide to every feature
- Arduino OLED game: a one-button runner on an SSD1306
- ESP32 desk robot with OLED eyes and touch moods
- ESP32 OLED clock with NTP time and big digits
- Arduino OLED menu with buttons
Free tools: Arduino Buzzer Song Generator for buzzer songs and sound effects, the OLED Animation Maker for SSD1306 animations, OLED Robot Eyes for robot faces, and the Image to Byte Array converter for bitmaps. See all tools.