OLED Block Coder: drag and drop Arduino OLED programming, with Snake, Dino and Pong games
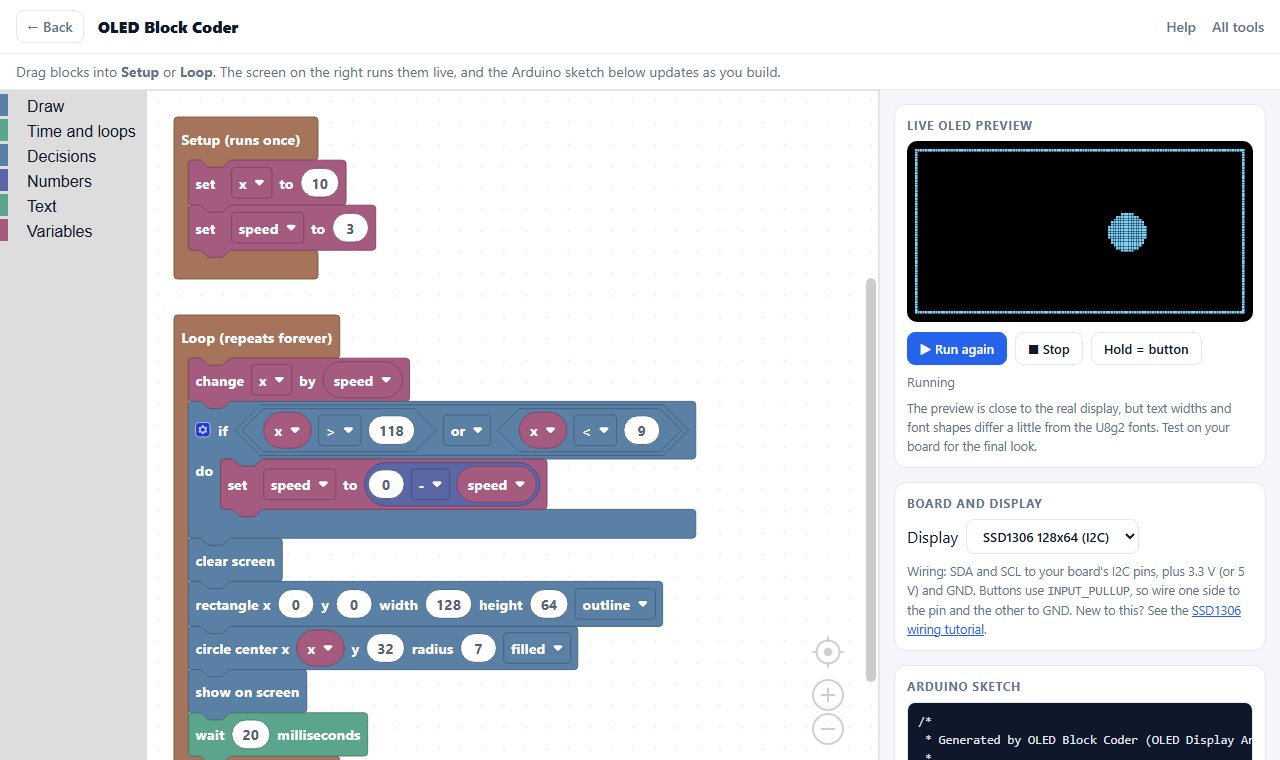
The Bouncing ball example: blocks on the left, the live OLED preview on the right, and the Arduino sketch underneath.
The OLED Block Coder lets you program an SSD1306 or SH1106 OLED display by dragging blocks together instead of typing C++. You pick blocks like write text, circle, wait and if button pressed, snap them into a Loop, and a virtual 128×64 screen runs your program straight away. When it looks right, you copy the Arduino sketch the blocks produced and upload it to your board.
I made it for people who know what they want the screen to do but get stuck on the code around it: the library setup, the font calls, the buffer, the delay and the loop. It works like Scratch or Blockly for kids, but the output is a normal U8g2 sketch that you can open in the Arduino IDE and keep editing by hand. Every example on this page was compiled with the real U8g2 library for an Arduino Uno.
Open the block editor →- Quick start in one minute
- What you need
- Wiring the OLED to your board
- How the editor works
- Every block explained
- Screen coordinates and text sizes
- Arduino OLED games: Snake, Dino, Pong
- Several buttons: OLED menu and 2-player Pong
- Five starter examples
- U8g2 example code
- Upload the sketch with the Arduino IDE
- How blocks turn into code
- Memory on Arduino Uno and Nano
- Troubleshooting
- Limits you should know about
- Frequently asked questions
Quick start in one minute
- Open the block editor. It starts with a working program: “Hello OLED” with a circle moving under it.
- Change something. Click the number 112 in the count with block and type 60. The circle now stops halfway across the preview.
- Under Board and display, choose the OLED you have: SSD1306 128×64, SH1106 128×64 or SSD1306 128×32.
- Press Copy code under Arduino sketch, paste it into the Arduino IDE and upload. Install the U8g2 library first if you have not already.
Want something more interesting first? Under Your project, choose an example from the Examples menu, or open one directly: the snake game, the dino runner game, button counter, bouncing ball, random stars or loading bar.
What you need
| Part | Notes |
|---|---|
| A board with an Arduino core | Arduino Uno, Nano, Mega, Leonardo, Uno R4, ESP32, ESP8266 (NodeMCU, Wemos D1 mini) or Raspberry Pi Pico |
| An I2C OLED display | 0.96 inch SSD1306 128×64, 1.3 inch SH1106 128×64, or 0.91 inch SSD1306 128×32. The 4-pin modules (GND, VCC, SCL, SDA) are I2C. |
| 4 jumper wires | Female to male if your board has header pins |
| A push button (optional) | Only for programs that use the button pressed block. No resistor needed. |
| Arduino IDE and the U8g2 library | Free. In the IDE open Sketch › Include Library › Manage Libraries, search for U8g2 and install the one by olikraus. |
Wiring the OLED to your board
Connect GND to GND and VCC to 3.3 V or 5 V. Most OLED modules have a regulator on the back and accept both, but on ESP32, ESP8266 and Pico use 3.3 V. Then connect SDA and SCL to the board's default I2C pins:
| Board | SDA | SCL | Button example pin |
|---|---|---|---|
| Arduino Uno, Nano, Uno R4 | A4 | A5 | D2 |
| Arduino Mega 2560 | D20 | D21 | D2 |
| Arduino Leonardo, Micro | D2 | D3 | use D4 (D2 is SDA) |
| ESP32 DevKit | GPIO21 | GPIO22 | GPIO4 or GPIO15 |
| ESP8266 NodeMCU / Wemos D1 mini | D2 (GPIO4) | D1 (GPIO5) | D5 (GPIO14) |
| Raspberry Pi Pico | GP4 | GP5 | GP15 |
The button block uses INPUT_PULLUP, so a button needs only two wires: one leg to the pin and the other leg to GND. Set the pin number on the block itself. On a Leonardo or an ESP board, change the example's pin 2 to one from the last column. For a step-by-step wiring guide with photos of the module, see the SSD1306 I2C tutorial.
How the editor works
- Setup and Loop. Blocks inside Setup run once when the board starts. Blocks inside Loop repeat forever, exactly like
setup()andloop()in an Arduino sketch. - Drag blocks from the left menu. Draw blocks put pixels into a hidden picture. A show on screen block sends that picture to the display, so end every frame with one.
- Watch the live preview. The screen on the right restarts after every change. Every pin used by a button block gets its own test button under the screen (Pin 2, Pin 3 …). Hold one, or several at once, or press keys 1 to 9 on your keyboard. Stop pauses it, Run again restarts it.
- Copy the sketch. The Arduino code updates as you build. Press Copy code or Download .ino. Warnings above the code tell you if a block sits outside Setup and Loop or if you forgot show on screen.
- Keep your work. Blocks are saved in your browser automatically. Save as file downloads a project file you can open later on any computer with Open file.
Every block explained
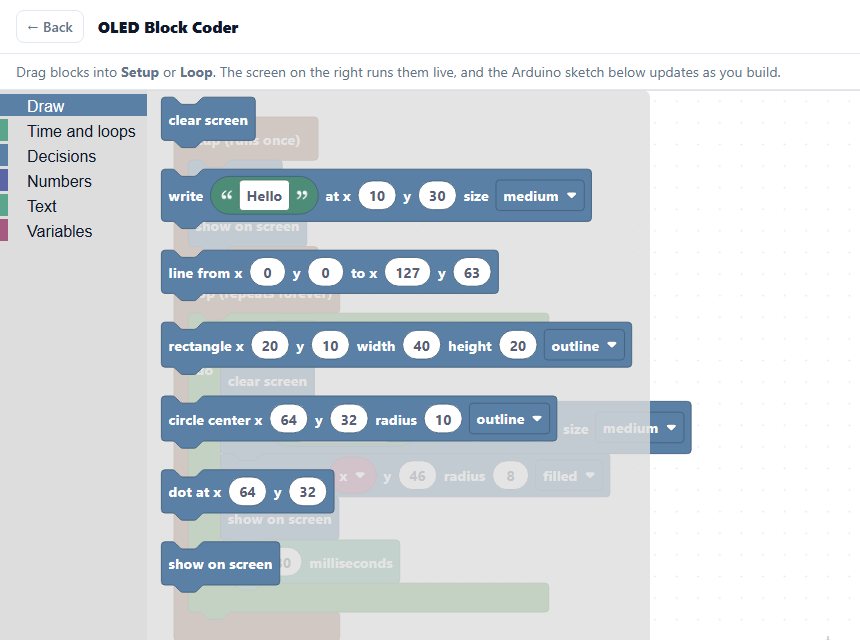
Click a group on the left (here Draw) and drag a block into Setup or Loop.
| Group | Block | What it does | Arduino code it makes |
|---|---|---|---|
| Draw | clear screen | Wipes the hidden picture | u8g2.clearBuffer(); |
| Draw | write … at x y size | Writes text, a number or a joined text | setFont(), setCursor(), print() |
| Draw | line | Line between two points | u8g2.drawLine() |
| Draw | rectangle, outline or filled | Box from its top-left corner | drawFrame() / drawBox() |
| Draw | circle, outline or filled | Circle from its centre | drawCircle() / drawDisc() |
| Draw | dot | One pixel | u8g2.drawPixel() |
| Draw | show on screen | Sends the picture to the OLED | u8g2.sendBuffer(); |
| Time and loops | wait | Pauses, 1000 ms = 1 second | delay() |
| Time and loops | repeat N times | Runs the inside blocks N times | for loop |
| Time and loops | count with | Counts a variable from one number to another | for (x = 0; x <= 112; x += 4) |
| Time and loops | repeat while / until | Repeats while a condition is true | while loop |
| Decisions | if / else if / else | Runs blocks only when a condition is true. Click the gear to add else. | if … else |
| Decisions | compare, and / or, not, true / false | Builds conditions such as x > 118 | >, &&, ||, ! |
| Decisions | button on pin N is pressed | True while the button is held | digitalRead(N) == LOW |
| Numbers | number, + − × ÷ ^, random | Whole-number maths and random positions | random(a, b + 1) |
| Text | text, join | Words, or words followed by a variable | several print() calls |
| Variables | create, set, change by | Remembers numbers such as a score or an x position | int score = 0;, score += 1; |
Screen coordinates and text sizes
The top-left pixel is x 0, y 0. On a 128×64 display x goes from 0 to 127 to the right and y from 0 to 63 downwards. On a 128×32 display y stops at 31, so move anything below that line up. Rectangles start at their top-left corner, and circles at their centre.
Text is different: the y of a write block is the bottom line of the letters, not the top. Text at y 0 is drawn above the screen and you will not see it. Use these values as a guide:
| Size | U8g2 font | Letter height | Lowest y for the first line | Characters per line (about) |
|---|---|---|---|---|
| small | u8g2_font_6x10_tf | about 7 px | 8 | 21 |
| medium | u8g2_font_helvB12_tf | about 12 px | 13 | 12 to 14 |
| large | u8g2_font_helvB18_tf | about 18 px | 19 | 8 to 9 |
Arduino OLED games: Snake, Dino runner, Pong and more
The Templates bar at the top of the editor has six ready games and fun programs. Each one uses a single push button on pin 2 (the other leg to GND), so you only need the OLED, one button and four wires. In the preview, hold the Pin 2 test button or press 1 to play. Every template compiles for an Arduino Uno with U8g2.
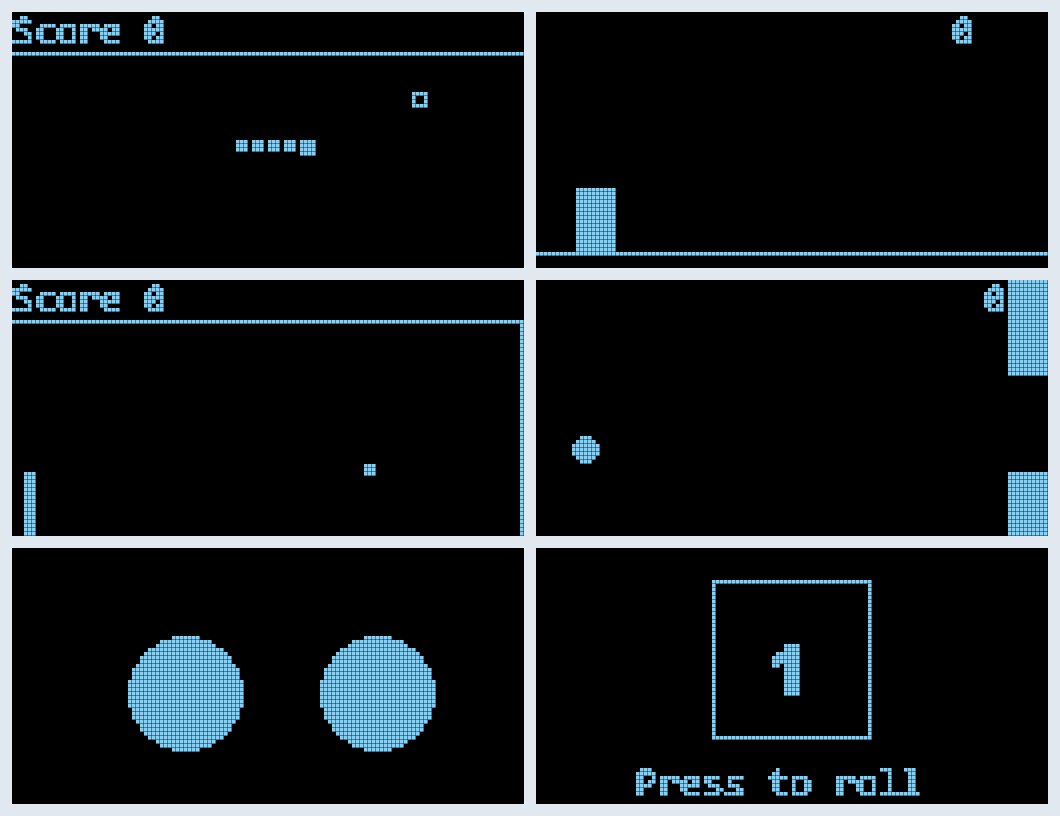
Top to bottom: Snake and Dino runner, Pong and Tap to fly, Robot eyes and Dice roller.
| Template | How to play | What it teaches |
|---|---|---|
| Snake game | The snake moves on its own. Each press turns it right (clockwise). Eat the square to score. Hitting a wall ends the game. | Direction as a number 0 to 3, a tail made of four position pairs that shift along each step, detecting a single press with a was variable, food at random grid positions |
| Dino runner | Press to jump over the cacti. Each cactus you pass adds a point. | Gravity with a speed variable (vy), a ground line, an obstacle that moves left and comes back at a random distance, box collision |
| Pong (one player) | Hold the button to move the paddle up, let go to move it down. Keep the ball in play. | A ball with x and y speeds that flip at the walls, a paddle that is kept inside the screen, scoring on each hit |
| Tap to fly | Hold to rise, let go to fall. Fly through the gaps in the pipes. | Falling with a speed limit, pipes with a random gap height, collision with the top and bottom pipe |
| Robot eyes | No button. Two eyes look around at random and blink. | Random positions, a random wait time, drawing a blink as a thin bar |
| Dice roller | Press to roll. The number flickers, then stops on 1 to 6. | Random numbers, a short repeat for the rolling effect, reacting once per press |
These are small on purpose, so you can read every block. Once a game works, change it: make the snake faster by lowering its wait 150, make the dino jump higher with vy set to −9, or move the Pong paddle faster with a larger change than 3. For a full robot eyes animation with moods, use the dedicated tool.
The snake in the template keeps a fixed length of five squares, because the editor has no lists yet. The score still counts every square you eat. If you are comfortable with C++, you can turn the four tail variables into arrays in the generated sketch to make it grow.
Using several buttons: OLED menu, joystick and 2-player Pong
You can use as many buttons as your board has free pins. Drag in a button on pin … is pressed block for each one and type a different pin number on each. The preview adds a test button for every pin it finds, so you can hold two at once, for example both paddles in Pong. The generated sketch sets pinMode(pin, INPUT_PULLUP) for every pin and lists them in the comment at the top.
Four templates show how it works:
| Template | Buttons | What it shows |
|---|---|---|
| Snake · 2 buttons | Pin 2 turn left, pin 3 turn right | Two buttons that each act once per press, with their own wasL and wasR variables |
| Pong · 2 players | Pins 2 and 3 move the left paddle, pins 4 and 5 the right paddle | Several buttons held at the same time, a score for each player, serving after a point |
| Move the dot · 4 buttons | Pin 2 up, 3 down, 4 left, 5 right | A simple joystick made of four buttons, keeping the dot on the screen, showing x and y |
| Menu · 3 buttons | Pin 2 up, 3 down, 4 select | A menu with a frame around the chosen line, wrapping from the last item to the first, and an action on select |
Pins on ESP boards: pins 2 to 5 are fine on an Arduino Uno, Nano and Mega. On an ESP32 avoid GPIO 1 and 3 (USB serial) and 6 to 11 (flash); use GPIO 4, 5, 18, 19, 23, 25, 26 or 27 instead. On an ESP8266 NodeMCU use D5, D6, D7 (GPIO 14, 12, 13) and D3 (GPIO 0). On a Pico any GP pin except the two used for I2C works. Change the pin number on each button block and the preview and the sketch follow.
Once per press or while held? A button block is true for as long as the button is down. That is right for moving a paddle, but a menu would jump through every item. To act once per press, use the pattern from the Menu template: if the button is pressed and was is 0, do the action; then set was to 1 while the button is down and back to 0 when it is released.
Five starter examples
Each one loads from the Examples menu in the editor, or from the links below. Load one, read the blocks, then change a number and watch what happens. That is the quickest way to learn what each block does.
- Button counter. A score variable goes up by one each time the button on pin 2 is pressed, and the screen shows “Score 6”. The 200 ms wait after the press stops one press from counting many times.
- Bouncing ball. Two variables, x and speed. Each loop adds speed to x. When x passes 118 or drops under 9, speed becomes 0 − speed, so the ball turns round. A frame rectangle draws the walls.
- Random stars. Repeat 12 times: a dot at a random x from 0 to 127 and a random y from 0 to 63. A new sky every 250 ms.
- Loading bar. count with p from 0 to 100 by 5 draws the percentage and a bar whose width is p × 116 ÷ 100. Good for boot screens.
- Moving circle. The starting program: “Hello OLED” with a filled circle moving along the bottom.
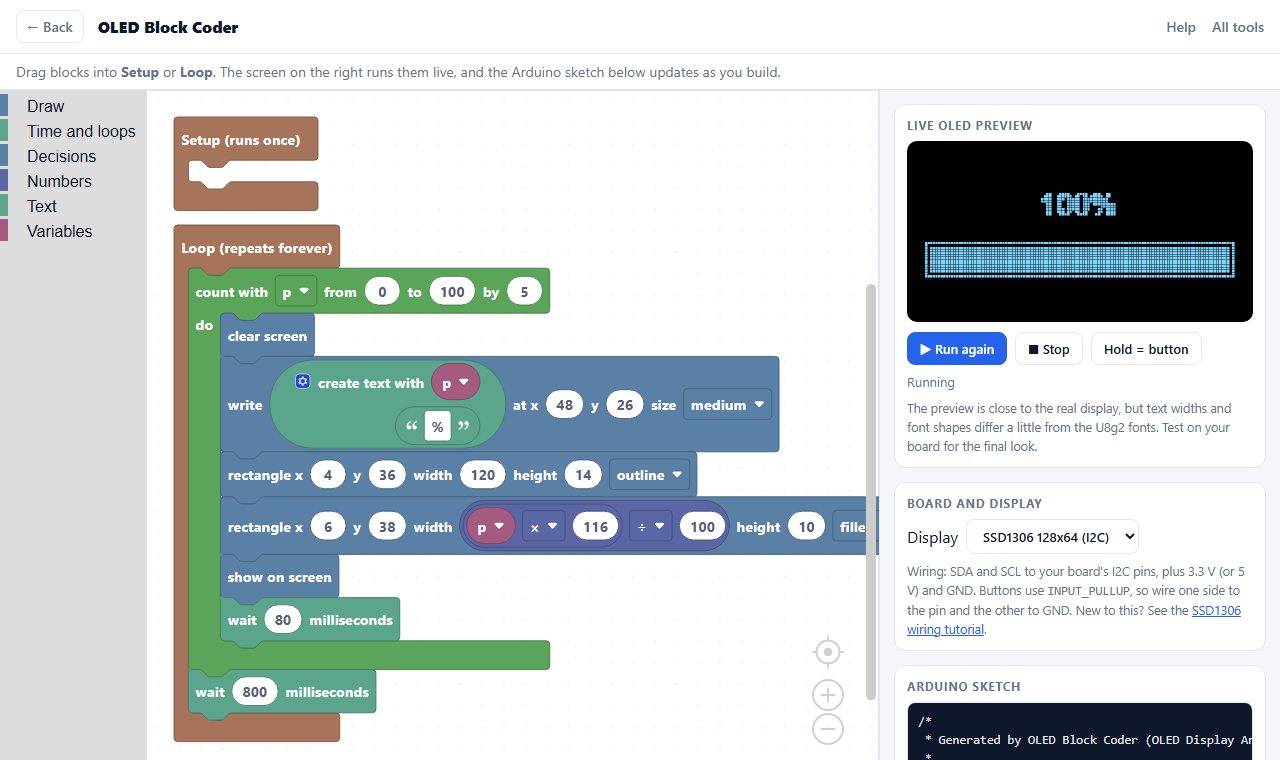
The Loading bar example. The width of the filled rectangle is worked out from the count variable.
U8g2 example code: the button counter sketch
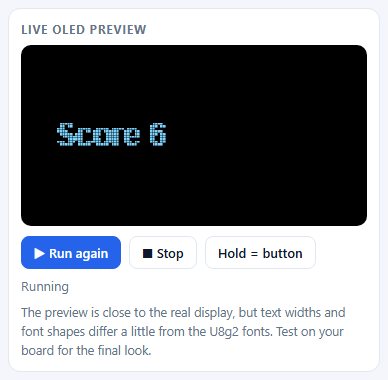
This is the sketch the Button counter example produces for an SSD1306 128×64, without the comment header. It compiles for an Arduino Uno with U8g2 2.36 and uses 37% of the flash. Wire a button from D2 to GND.
#include <Arduino.h>
#include <U8g2lib.h>
#include <Wire.h>

U8G2_SSD1306_128X64_NONAME_F_HW_I2C u8g2(U8G2_R0, U8X8_PIN_NONE);

int score = 0;

void setup() {
  u8g2.begin();
  pinMode(2, INPUT_PULLUP);
  u8g2.clearBuffer();
  u8g2.sendBuffer();
}

void loop() {
  if ((digitalRead(2) == LOW)) {
    score += 1;
    delay(200);
  }
  u8g2.clearBuffer();
  u8g2.setFont(u8g2_font_helvB12_tf);
  u8g2.setCursor(10, 36);
  u8g2.print("Score ");
  u8g2.print(score);
  u8g2.sendBuffer();
  delay(20);
}
For an SH1106 1.3 inch display the only change is the constructor line: U8G2_SH1106_128X64_NONAME_F_HW_I2C. For a 128×32 display it is U8G2_SSD1306_128X32_UNIVISION_F_HW_I2C. The editor switches this for you when you change the display.
Upload the sketch with the Arduino IDE
- Install the U8g2 library: Sketch › Include Library › Manage Libraries, search U8g2, install.
- For ESP32, ESP8266 or Pico, add the board package first under Tools › Board › Boards Manager.
- Create a new sketch, delete what is there and paste the code from the editor (or open the downloaded
oled_blocks.ino). - Choose your board under Tools › Board and its USB port under Tools › Port.
- Press Upload. The display should show the same thing as the preview within a second or two.
How blocks turn into code
You are not locked into the blocks. The sketch uses plain U8g2 calls such as u8g2.drawDisc(), u8g2.setCursor() and delay(). Every variable becomes an int at the top of the sketch, a repeat block becomes a for loop with its own counter, and a button block becomes digitalRead(pin) == LOW with pinMode(pin, INPUT_PULLUP) added to setup() for you.
The display runs in U8g2's full-buffer mode (the _F_ in the constructor). Drawing blocks change a copy of the screen in memory, and show on screen sends the whole copy in one go. That is why nothing appears until the show block runs, and why animations do not flicker. Division by zero is guarded, so a ÷ block with 0 gives 0 instead of crashing the board.
The comment block at the top of the sketch lists the display, the library and the button pins, so you can see the wiring months later without the editor.
Memory on Arduino Uno and Nano
A 128×64 screen needs 1,024 bytes of RAM for the full buffer, and an Uno or Nano has only 2,048. The test program with every block type used 76% of the Uno's RAM for a 128×64 display and 51% for 128×32. That is fine for block programs, but if you later add other libraries to the sketch by hand and the IDE warns about low memory, change _F_ to _1_ in the constructor. That uses page mode, which needs a different drawing loop, so only do it if you are comfortable editing the code. ESP32, ESP8266, Pico and Mega have plenty of RAM.
Troubleshooting
| Problem | Likely cause and fix |
|---|---|
| Screen stays black | SDA and SCL swapped or on the wrong pins (see the wiring table). Check that the program has a show on screen block. |
| Random dots or a shifted picture on a 1.3 inch display | It is an SH1106. Choose SH1106 128x64 and copy the code again. |
| Still black after checking the wires | Your module may use I2C address 0x3D. Add u8g2.setI2CAddress(0x3D * 2); on the line before u8g2.begin();. |
U8g2lib.h: No such file or directory | The U8g2 library is not installed. Install it from the Library Manager. |
| The counter keeps counting without a press | The button is wired to 5 V instead of GND. With INPUT_PULLUP the other leg must go to GND. |
| One press counts many times | Add a wait 200 milliseconds block right after the change block, as in the Button counter example. |
| Text is cut off at the top | The text y is the bottom of the letters. Use at least 8 for small, 13 for medium and 19 for large. |
| Nothing below the middle on a 0.91 inch display | A 128×32 screen ends at y 31. Choose SSD1306 128x32 and move your blocks up. |
| The preview says the loop has no wait | A loop with no wait would freeze the browser, so the preview stops. Add a short wait such as 20 ms. |
Limits you should know about
- Displays: SSD1306 128×64, SH1106 128×64 and SSD1306 128×32 over I2C, using the U8g2 library. SPI wiring and other sizes are not supported yet.
- Whole numbers only. Every number is an
int, so 7 divided by 2 is 3. This keeps the preview and the board in agreement. - The preview is close, not exact. Shapes, lines and timing match. Text in the preview uses browser fonts, so letter shapes and widths differ a little from the real U8g2 fonts.
- No sensors, Wi-Fi, servos or bitmaps yet. Buttons work. Everything else is about drawing on the screen. To show a picture or a logo, convert it with the image to byte array tool and add it to the sketch by hand.
- Random numbers repeat after a reset. Arduino's
random()starts from the same seed. AddrandomSeed(analogRead(A0));tosetup()by hand if you want a different sequence every time.
How it differs from the other tools here
The OLED Animation Maker is for frame-by-frame pixel art and imported GIFs, where you draw each frame. This tool is for logic: a ball that bounces, a score that counts, a screen that changes when you press a button. The OLED Robot Eyes tool makes ready animated eyes, and the OLED Simulator previews finished animations. If you want sound as well, the Arduino Buzzer Song Generator writes the buzzer code.
Frequently asked questions
Do I need to know how to code?
No. You drag blocks together and the tool writes the Arduino code. You still need the Arduino IDE and a board to upload it.
Which displays and libraries does it support?
SSD1306 128×64, SH1106 128×64 and SSD1306 128×32 OLEDs over I2C, using the U8g2 library.
Does the code work on ESP32, ESP8266 and Raspberry Pi Pico?
Yes. The sketch uses hardware I2C through U8g2, so it runs on any board with an Arduino core. Wire SDA and SCL to that board's default I2C pins from the wiring table.
Is the preview exactly what the real display shows?
It is close. Shapes, lines and timing match. Text differs a little, because the preview uses browser fonts instead of the U8g2 fonts.
My OLED stays blank. What should I check?
The wiring, the display type (SH1106 or SSD1306), the show on screen block and the I2C address. The troubleshooting table covers each one.
Can I use several buttons?
Yes. Use one button block per button with a different pin on each. The preview shows a test button for every pin and you can hold several at once. Sensors, Wi-Fi and servo blocks are not available yet.
Can I make Arduino OLED games without writing code?
Yes. Load the Snake, Dino runner, Pong, 2-player Pong or Tap to fly template, change the blocks, test it with the on-screen buttons and copy the sketch. Each game needs only an OLED and one to four push buttons.
Is it free?
Yes. There is no sign-up, and your blocks stay in your browser unless you save them as a file.
Can I use the OLED Block Coder on a phone or tablet?
Yes. The blocks can be dragged with a finger and the preview sits under the editor on small screens. A tablet or a laptop is more comfortable for big programs, and you still need a computer with the Arduino IDE to upload the sketch.
Is it good for classrooms and beginners?
Yes. There is no account to create, it runs on school laptops and Chromebooks, and every block shows the C++ it produces, so students can move from blocks to real Arduino code step by step. The templates make good first lessons on variables, loops and if blocks.
Can I use the Adafruit SSD1306 library instead of U8g2?
The sketch is written for U8g2, which handles SSD1306 and SH1106 with the same code. You can install U8g2 next to the Adafruit library without any conflict. If you need Adafruit code, most calls map directly: drawBox becomes fillRect, drawFrame becomes drawRect and drawDisc becomes fillCircle.
Can I run the generated sketch in an online simulator?
Yes. Simulators that include the U8g2 library and an SSD1306 display, such as Wokwi, can run the sketch without hardware. Add push buttons to the same pins and connect their other side to GND.
How many buttons can I use?
As many as your board has free pins. Each button block with a new pin number adds a test button to the preview. Keys 1 to 9 on your keyboard press the first nine.
Why are numbers whole numbers only?
Every variable becomes an int in the sketch, so the board and the preview always agree, and division drops the remainder (7 divided by 2 is 3). Pixel positions are whole numbers anyway, so drawing is not affected.
How do I share a project with a friend?
Press Save as file and send the .json file. Your friend opens the editor and uses Open file. To share a template, send its link, for example tool.html#ex=snake opens the Snake game.
Are my blocks uploaded to a server?
No. The editor runs in your browser and keeps your blocks in this browser's storage. Nothing is sent anywhere unless you save a file and share it yourself.
Does it need an internet connection?
You need a connection to open the page, because the block editor is loaded from the web. After it has loaded, building blocks, the preview and the generated code all run in your browser.
Open the block editor →